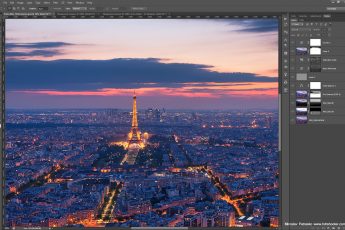
An we have another Tuesday here, and another process post. For today I have chosen an evening shot from Paris, so lets take a look at it.
For this photo, I took 6 exposures, but used only 5. I had no need for the +2EV. As always I started in Lightroom, where I corrected the white balance, horizon line a cropped the image. From there I loaded all the brackets into Photoshop and continued with the following edits (layers numbered from bottom up):
1. -2EV exposure to start with, as I usually start with the one, from which I want to use the sky
2. -3EV exposure to tone down few bright spots
3. -1EV exposure to brighten the foreground
4. 0EV exposure to brighten the foreground even more
5. +1EV exposure to brighten the trees
6. added detail using a high pass filter
7. Color Efex pro contrast, to bring more local contrast into the photo, but then toned down with opacity at 60%
8. a little bit of overall contrast using curves
And that was all.
Here you can see the original 0EV exposure, for the camera info, please visit the original blog post.


Hello,
I have a question for a long time, How can you painted the mask so accurate?
Can you teach me?
Thank you so much!
Hi Jeff, they are all created using luminance masks. I’m working on a tutorial, but for now, you should try the ones from Jimmy McIntire (there is a link to them in the sidebard, the Post-processing master courses)