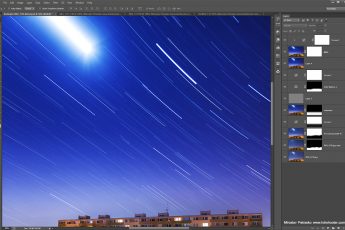
Another week, another processing Tuesday. To make it a little different, I chosen to show you how I edited my first star trails shot. And for those who never did a shot like that, this post will also show how to combine the images. So here goes.
I took 46 exposures, each one taken at 30s, f2.8 and ISO 800. They all looked something like this, just with the stars in different positions.

I started my work as always in Lightroom, where I applied noise reduction, cropped the image and removed chromatic aberrations and lens distortions. I also corrected the white balance.
From there I loaded all the images into Photoshop Layers. I selected all the layers except the first one and changed the blending mode to Lighten. That means that Photoshop will choose the lightest pixel for every spot in the photo from all the layers.
I then hidden all the layers, except the first one, and one by one I went through all the layers, checking if it contains any trails from passing planes. If I seen any, I added a layer mask, and removed it.
After that I merged all the layers, so I don’t have so much layers to work with and continued as follows (layers numbered from bottom up)
1. the merged layer
2. one of the exposures, where the tree was lighten up by car lights. I added it to brighten the tree
3. I removed few items in the foreground I didn’t liked
4. Color Efex Pro contrast on the foreground, to brighten it up and bring out the details
5. curves to add medium contrast
6. levels to bring out all the white areas in the photo, specially the stars
7. hue/saturation to tone down the red color cast from the tree
8. just a merged layer, I needed to apply a action on (and forgot to delete :))
9-10. added glow, using the glow action in my tutorial
11. added a little more contrast
12. added more saturation to under saturated areas, the mask was created using TK actions.
And that’s all I did here.


thanks a lot
it’s helpful :)