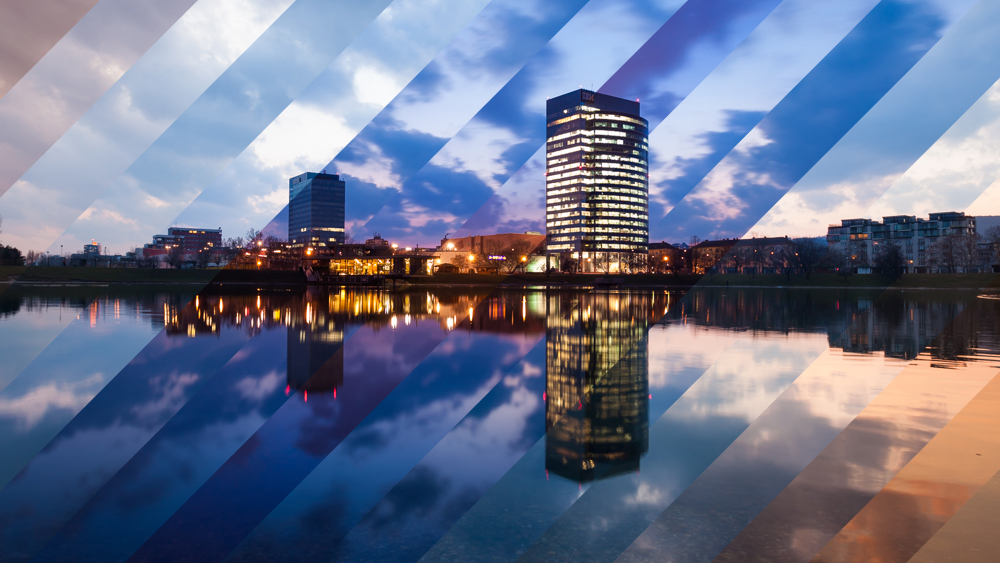
This photo is not as colorful as my other photos from Dubai, but it nicely shows why almost all of them are blue hour/night time shots. Even such a stunning city as Dubai, can look just boring with the wrong light. And during the week I was there, the sunsets looked mostly like this. Still it’s an interesting view, so I decided to edit the photo anyway :)

This is a blend from 3 exposures, edited in Photoshop.
Down the road

I normally don’t really like to take photos of graffiti. It’s not really something that I find that interesting (except when it really done well :)). But the John Lennon wall looks so crazy, that every-time I go by it, I have to take few shots. And it always changes, so the shots look never the same :) Also, these photos are always the easiest to create names for. One just has to choose from the huge number of suitable names, right in the photo.

This is a single image edited in Oloneo Photoengine, finished in Photoshop.
We've only got the one

For today I experimented even more with my photos. So just in Photoshop, I created this crazy image, with varying times. You can see here a single frame first, as the whole animated gif is over 4Mb big, and it can take a moment to load completely.

Bratislava-moving-prev

This animation is created from 9 images, all spliced together into 16 frames for this. Took a little while, so I will have to find a little faster process, if I ever do another one :) I hope you like it.

Bratislava-lapse

As every photographer, I love to play with new gear. So when I found out that a friend of mine had a tilt-shift lens, I immediately had to borrow it to take a few shots :) It’s really interesting how you can affect whats in focus and whats not with a lens like that. But as it was a 90mm lens, I had to go somewhere high up and far away to get the effect I wanted. So where else to go as to my favorite spot in Bratislava, the top of the SNP bridge. And as you can see, the result is quite interesting :)

This is a manual blend from three exposures, created in Photoshop.
Tilt-shift experiments

For today I prepared another addition to my processing post series. Today we will take a look at a photo I took in the Grand Mosque in Abu Dhabi. It really is a grand majestic place, just the white wall create a little challenge when editing. But lets take a look at it.

The final photo I created looked like this:
Endless
I started with 5 exposures, which I loaded into Lightroom. Here you can see the 0EV exposure:

Endless

As you can see, the white balance was totally off. I set it for a shot I took before this one, and forgot to change it (that’s why one should always shoot in RAW :)). So in Lightroom I corrected the white balance, removed the chromatic abberation, cropped the image and corrected the lens distortion.

Endless

I then exported all the files as 16-bit Tiff files and loaded them into Oloneo Photoengine. After tweaking the strength and contrast, I got quite an even result.

Endless

I then loaded all the original exposures and the Photoengine result into Photoshop layers and continued from there. The Photoengine result looked quite ok, but it was not what I wanted. A very classic problem with HDR was visible here, all the white walls just looked grey. My goal in editing was to make them white and shining like the real building. As the walls in the mosque are quite reflective, I wanted to show all the light reflection from them. So in the Photoshop, I did the following (layers numbered from bottom up) :

1. Oloneo Photoengine result
2. +1EV exposure, set to Lighten blending mode. This mode makes this layer replace all the bottom layer pixels, which are darker
3. +2EV exposure, set to Lighten blending mode but only at 40% opacity. I also removed the brightest parts with a layer mask. With this I got the wall looking very bright (exactly as I wanted :))
4. a copy of the HDR Photoengine result, set to soft light. I brushed in only parts, to restore the texture in the floor
5. merged layer, with a strong noise reduction applied to it. Layer mask used to have the effect only on the sky.
6. merged layer, in which I retouched out all the people in the background
7. one more merge where I corrected few areas where the lights were bleeding into the blue sky
8. added linear contrast to the whole photo
9. added saturation to the yellow channel, to make the gold ornaments more prominent
10. color balance to make the whole photo warmer

Endless

And that’s all I did with this image. To find out more on how I edit, check out the guides and before after categories on this blog, or check out my video tutorial series here:
banner-master

Page 3 of 7« First ...2345... Last »
FREE EBOOK!!!
Subscribe to my newsletter and get a free Capturing fireworks ebook. 
Subscribe