So my crazy weekend is over, 4 night of taking photos at parties and also some during the day :) Haven’t slept much, but I need to quickly get back to my normal routine, so how about to start today. So as always, a new process post today for you.
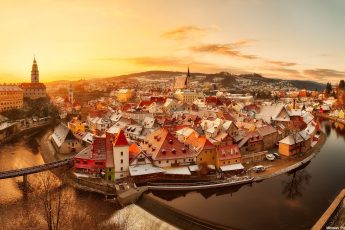
Let’s first look at the final photo, and the starting exposure.
As always I loaded all the exposures into Lightroom, where I corrected the horizon, white balance and also chromatic aberrations. From there I exported all the files and loaded them in Oloneo Photoengine. I changes the strength and the contrast to get a blend I wanted and continued in Photoshop.
I loaded all the exposures in Photoshop and did the following edits (layers numbered from bottom up):
1. Oloneo Photoengine result
2. I created a second result in Oloneo Photoengine, a brighter one. Here I used a lights luminosity mask to brighten all the white parts of the water.
3. Original exposure, to correct the moving people on the bridge
4. Brushed out the railing as it didn’t fit the composition I wanted.
5. Color Effex polarization, to bring more blue into the sky
6. Color Effex Pro contrast to get more detail
7. I added more overall saturation here, as I felt there is not that much color in the photos
8. Nik Dfine to remove noise
9. Brightened the bottom right corner, as it looked too dark
10. Little bit of overall contrast
And that’s all what I did with this photo :)


Leave a Comment