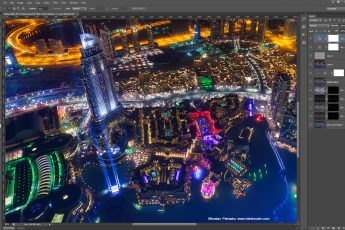
For this Monday, I chosen a little more complicated photos from Dubai. Not only did I used two series for this one, but I also replaced parts from the image to get a better symmetry. But lets get started :)
Let’s take a look at the final and the original exposure. You can see I changed the colors a lot, and also the crop and the distortion.
I started as always in Lightroom. I used two series with the same settings, but one focused on the city in the background and one on the foreground concrete. I did this so I had both in focus. Just stepping down the aperture would not work, as this was an extreme DOF. I corrected the lens distortion and synced the settings to all the exposures. I left the corner as it is, as I didn’t want to crop that much away, and I knew I could fill that in in Photoshop.
From here I exported them all and merged both series in Oloneo Photoengine. I used the same settings for both, so I can easily blend them together later. AFter that I continued in Photoshop (layers numbered from bottom up):
1. Oloneo Photoengine result, exposures focused on the foreground.
2. Copy of the left part of the first layer, flipped and then manually painted into the image, to create a better symmetry, but still keeping a different texture, so it’s not so obvious :)
3. Oloneo Photoengine results, exposures focused on the background. Masked out the whole foreground concrete from it.
4. Corrected the sky using content aware fill.
5. Corrected the highlights using the -1EV exposure.
6. Still few more highlights to correct from the -2EV exposure.
7. Color Efex Skylight filter, to get more color into the photo.
8. Color Efex Detail Extractor, to get more detail in the foreground, and a little bit in the city.
9. Noise reduction using Imagenomic noiseware.
10. Color Efex Cross processing, to shift the color of the city more towards the blue.
11. More contrast to the city.
12. A little bit more of retouching, as there appeared a little glow around the foreground. I just used the Clone stamp tool to darken it a little down.
And that’s all I did with this image. To find out more on how I edit, check out the guides and before after categories on this blog, or check out my video tutorial series here:


Leave a Comment