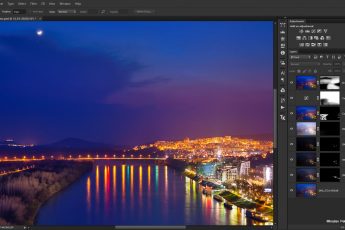
There was no process post last week, as I was away, but let’s get back to one this week. Today I will show you how I edited this night photo from Vienna, so let’s get to it :)
This was taken on a quite cold, rainy evening in the city, so as you can see from the original photo, everything just looked yellow. So thats was one of the main problems I had to correct. I also wanted to create more separation between the bridge, the water and the sky.
I started in Lightroom, where I did my basic tweaks, like removed chormatic abberations, cropped the image and then also corrected the white balance for a cooler photo. Then I continued in Oloneo Photoengine. I just changed the strength and contrast. Nothing else. That how easy it is usually there :)
From there I continued in Photoshop, where I did the following edits (layers numbered from bottom up):
1. Oloneo result
2. Copy of layer 1, on which I removed the lens flare visible on the sky and on the bridge
3. -2EV exposure to darken the lights in the middle of the bridge
4. Darkened the bottom border from the -1EV exposure, as it was too bright after the merge
5. Hue/saturation, to tweak the light color under the bridge, which looked too red. Moved it more towards yellow.
6. Another Hue/saturation to tweak the light of the bridge, that looked too green. Moved them more towards yellow.
7. Brightened few dark spots from the +2Ev exposure.
8. I found one more spot in the water, which I removed on this merged copy.
9. Brightened the lights from the -1EV exposure.
10. Color efex Tonal contrast to add more detail into the water.
11. Added a little overall contrast.
And that’s all I did with this image. To find out more on how I edit, check out the guides and before after categories on this blog, or check out my video tutorial series here:


Leave a Comment