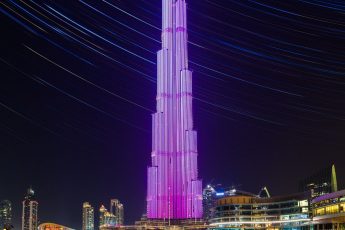
Let’s look at how one of my recent photos was edited. Today I will show you this night shot with star trails, I took few weeks ago in Vienna. So let’s start.
For this photo I took over 200 exposures. First I took two hours worth of 30s shots for the stars. As the Sony a7R does not have an intervalometer in it, what I did was, I set the camera to continuous shooting and locked in the shutter button on the remote. It worked without any issues. For each of these photos, I corrected the lens distortion, chromatic aberations and white ballance in Lightroom.
I also took 3 additional exposures, each with shorter times, for all the lights in the scene. I did the same corrections in Lightroom on them as for all the other photos.
I exported all as tiff files, and started with creating the star trails. As loading them all at once would probably kill my computer, I loaded them in 20 image stacks, where I only changed all to lighten blend mode and flattened them into one layer. While doing that, I also masked out few parts from the right, as there was the setting moon and it created a little glow.
From there I blended in the darker exposures to correct the few lights and removed the few people that were in the shot. To get the final look, I corrected out the fisheye distortion, added Color efex detail extractor and Pro contrast to make the stars more visible. I finished the edit with more saturation in the blue, and overall contrast.
And that’s all I did with this image. To find out more on how I edit, check out the guides and before after categories on this blog, or check out my video tutorial series here:


using your new sony an lighten blendmode, do you have no gaps in the star trails between individual expositions? Using my canon 5DII & magic lantern the delay between each two shots always results in small gaps which are visible even at 20×30 cm photo, unless I use a software dedicated to this issue.
There are gaps. I don’t think there is a camera that can start making another photo so quickly that there would be non. Probably the only way to avoid them completely is to do one long exposure instead of multiple. But due to how big the 36mpix files are, you don’t see them so much :)
if you bother, there are free and simple-to-use utilities to merge star trails pictures and remove gaps in one step. I tried only one – http://www.startrails.de – and was satisfied both with the result and the simple workflow.
if you bother, there are free and simple-to-use utilities to merge star trails pictures and remove gaps in one step. I tried only one – http://www.startrails.de – and was satisfied both with the result and the simple workflow.