Some photos are about the composition, some are about the subject, and some are just about the colors. And I really like how simple this one is. It’s even hard to take a photo like this. One would just like to stand there and enjoy the beauty :)

This is a single exposure, on which I did only few edits in Lightroom, and a bit in Photoshop. Photo taken at the Neusidlersee in Austria.

Simple beauty
Technique: Photoshop edit, Number of exposures: 1, Camera Model: Canon EOS 5D mark II, Lens: Canon 16-35mm F2.8, Focal length: 35mm, Aperture: 18, Middle exposure time: 0.8s, ISO: 100, Tripod used: yes, Location: 47.860685, 16.826951

To break a little from the night and fog shots, here is one I took in the middle of last years summer. This was taken in the vineyards above the city Spitz. It’s a really beautiful area, and whats even nicer is that is completely accessible, without any fences.

These were not really my favorite lighting conditions. When the sun is so high up, and there are just no clouds, the light is just too harsh for it to be nice. But when you have nothing else for days and days, you have to take what you got :) This is a single exposure, edited in Lightroom and Photoshop.

From the vineyard

Technique: Photoshop Edit, Number of exposures: 1, Camera Model: Sony a7R + Metabones MkIII Adapter, Lens: Canon 16-35mm F2.8, Focal length: 35mm, Aperture: 16, Middle exposure time: 1/13s, ISO: 100, Tripod used: yes, Location: 48.369212, 15.416969

There are many things that can help you in times when no tripods are allowed, and today I will take a look at one of those, a tablet top tripod. Specifically, this is one from Manfrotto, the MTT2-P02 (this model is not so available anymore, but you can find a black version Manfrotto 709B quite easily).

This, and most other, tabletop tripods are meant to be used with smaller, mostly compact cameras. But since this one is made from metal, it can easily hold much bigger weight than a compact camera.

Manfrotto Table Tripod

With this Manfrotto one, I used up to a Canon 5D mark II with a 24-70mm f2.8 lens. It was even easier with the Sony a7R, as that moves the camera more back and it balances better. The only adjustment I needed to do, is to make sure one of the legs of the tripod is under the lens, so it can’t tilt over.

I would not suggest using this tripod with a heavy camera and putting the camera in some crazy angles. Leveled is the most stable orientation one gets, and one should mostly stick with it.

Manfrotto Table Tripod

This table tripod can be directly attached to a camera or you can attach a clamp first, and then use your regular quick release. Actually using a L bracket with it is much easier, as you normally cant really rotate a big camera vertically. There just isn’t enough room before bumping into the legs.

The included ball head is tiny. So when you loosen it, the camera falls over instantly. So one has to hold it before doing so. It has a slit on the side for vertical orientation, but as mentioned, that is not that useful when using a bigger camera.

I did quite a lot of photos from this mini table tripod. I even did some panoramas and vertoramas from it. It’s great when you are not allowed to use a regular tripod, or you are faced with maybe a small wall, where you cant put the regural tripod on. It really is helpful, and it, or a similar table tripod should be a part of you equipment.

Especially in HDR photography, and also on my blog, you may have seen EV being used quite often. And today, together we will look at what EV means, and how you use it.

EV – Exposure value

In the first part of this series, I talked about Exposure. As I explained, exposure is about how much light you let into your camera. Exposure value (EV) is any combination of shutter speed, aperture and ISO (some don’t include ISO, but I think it should be included) that yields the same exposure for a specific fixed amount of light.

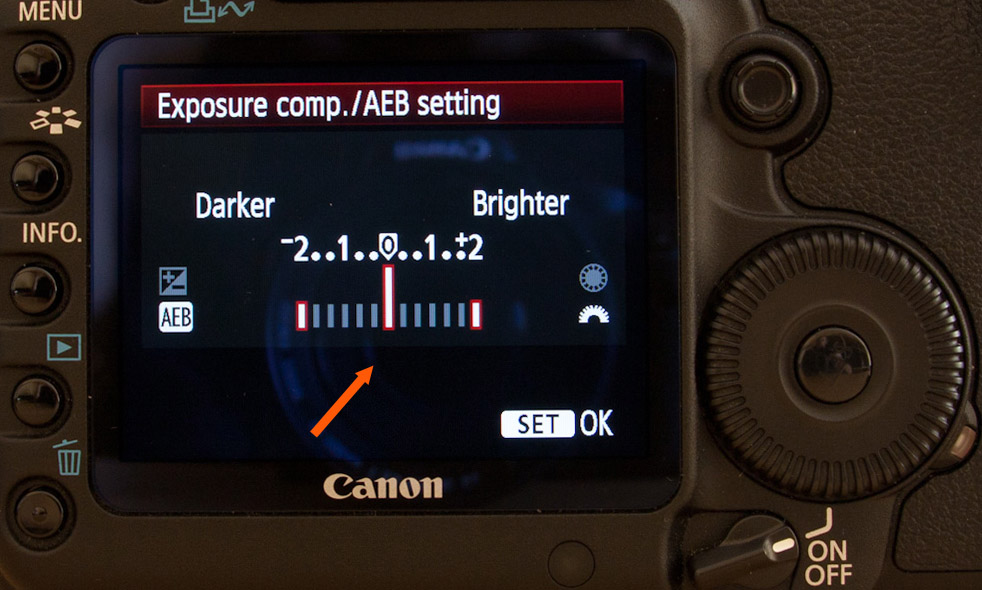
On your camera, you will see a scale with 0 in the middle, mostly going from -2 to 2 or from -3 to 3. This shows the current EV value.

Bracket settingsIf the value is shown as 0EV, this means, that the set settings for shutter speed, aperture and ISO together allow for an exposure, that is correct based on the cameras own metering of the current scene. If the EV is a negative number, that means that the resulting photo will be underexposed, if it’s a positive number, it will be overexposed. There are no specific settings for 0EV, as it changes based on available light, camera mode, lens and what from the three values you have changed yourself.

When you take 0EV as the amount of light you need the capture for proper exposure, than +1EV is double the light, +2EV is four times the light and so on. -1EV is half the light captured, -2EV is quarter and so on. So the amount always doubles or half’s, based on which way you go. EV can also be set in fractions, like 1/3rd, 2/3rd’s. On some cameras you can switch this to use half’s.

To double the light, so going one stop up, you either double the time, double the ISO or double the aperture. This is easy to count for shutter speed and ISO, where you just double the number. For aperture, this is not so straightforward and an aperture table is needed. For instance to double F8 you go to F5.6, to double F5.6 you go to F4 and so on. But since every-time you change any of these values on your camera, they change by 1/3rd EV. So if you change the value three times, it will change by 1EV.

For instance, if you shoot in the Aperture priority mode, and you have a scene where f2.8, ISO 100 and 1/10s will result in correct exposure, that is 0EV, than also f2.8, ISO 200 and 1/20s will give the same result, f.4, iso 100, 1/5s, and so on. Each time you change one value, one of the other two has to change to compensate, for the EV to stay at 0.

Exposure compensation

First use for EV and their understanding is Exposure compensation. It probably happened to you, that you have been shooting in a certain conditions (snow covered landscape is a perfect example here) and all you photos came out too bright or too dark. Thats because your camera has problem determining the correct exposure. In this case you can compensate for this, by forcing the camera to take a positive or negative value EV instead of the 0 one.

So for instance, the mentioned snow example, cameras tend to underexpose in those situations. So by setting the exposure compensation to +1/3EV or higher, you will force the camera to overexpose every photo, so compensating for the problem.

Using exposure compensation is different on every camera, but mostly there is a wheel you turn to do so in the menu, or there is a specific wheel with EV markings on it. These have no effect in the Manual mode, as there you have to compensate manually by changing the aperture, shutter speed and ISO values.

Exposure bracketing

Exposure bracketing, is taking (or setting the camera to take) multiple photos with different EV values. For instance you can take a series of 5 photos, at -2EV, -1EV, 0EV, +1EV and +2EV.

This is for instances, where you know, that not everything will be exposed in the 0EV photo properly. Again, a typical example would be having a bright sky on half of the picture. Either your scenery, or your sky is properly exposed, but usually not both. Having multiple photos with different exposures, will endure you, that you have one with properly exposed sky and one with scenery. With those, you can then continue as you need, blend them, use HDR or similar.


And advance mode would be just to manually bracket for the EV values you need, and not even do the whole series.

You can take a look at my article about taking brackets for HDR, where I also included a video that shows exposure bracketing.

All the exact exposure values can be also calculated using mathematical equations, but I don’t think you will ever need it in the field. When taking photos the camera doest that for you :)

Page 6 of 6« First ...3456
FREE EBOOK!!!
Subscribe to my newsletter and get a free Capturing fireworks ebook. 
Subscribe