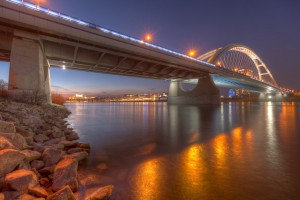
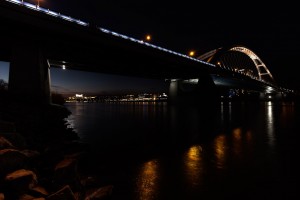
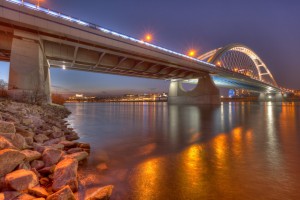
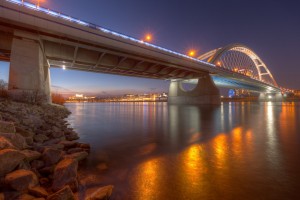
Before I started with HDR photography, I created a lot of abstract images in Photoshop. This page shows a lot of my works, but so its not just a gallery, I thought I give a little more background on how I learned to work with Photoshop here. I put images in between parts of the text, so this page looks a little more balanced :)


How I learned to use Photoshop

I started with Photoshop around 12 years ago (yes, the time passes by so quickly :) ). I’m completely sure if it was the 6th or 7th version of Photoshop, but I know it was before the CS one. I’ve been experimenting with it also before that, but newer take more time to learn more.

But than one year on the University, when I finally had a PC strong enough to run Photoshop properly (how this sounds silly now, doesn’t it) I started using it more and more, getting hang of the tools, techniques and shortcuts.

 
I looked at books about Photoshop at that time, but I found them all to be very boring. Each time after I tried to read one, I quit after few chapters. They just read as a manual and I don’t think that they are that helpful anyway. Even now, when it goes to editing, I prefer shorter eBooks, that deal with a certain subject, or go directly to the video.

But as I started, I found myself a simple way to learn, without it being boring. I started doing shorter Photoshop tutorials, few each day, each time from different categories. Just take a look at these two sources of some great easy tutorials, Deviantart and GoodTutorials. On both sites the tutorials are split into multiple categories, and I found the photo editing and drawing categories of Photoshop tutorials the best. And these are the tow sites I used at that time :)

 
The good things about these tutorials is, that you will have a result quickly enough to keep your attention, and you can try something new each time. Of course over time one needs a better explanation of some techniques/features, that one can’t find in such tutorials, but most things can be just learned by doing.

 
Another thing that helped me in the beginning, is that I started posting my results online quite soon. Of course not the results of the tutorials, but already my own creations. With the abstract art, I posted it to Deviantart, and later with photos to Flickr. Seeing positive (and even negative) reactions from people can motivate one to keep going and improving ones own skills. One just can’t take things personally, and continue with the work.

And not to be discouraged, here is a screenshot of a folder containing all my early attempts with Photoshop. Taken before I created these abstract art images and long time before my photos :)
Photoshop experiments
 

A gallery of my art experiments

And here are few more of the images I created while learning (or better said, after I already learned something :)). There are few more images, which can be found on my already very old Deviantart page http://theodevil.deviantart.com

P

Last night in Madrid

HDR tutorial (ver. 1.0)

I have split this HDR tutorial into multiple parts. Now I’m adding the third part, with the others coming later. So at the end there will be all this:

What is HDR?

Let’s make it as simple as possible. HDR is a way you combine multiple shots, so you have no overexposed areas and detail in dark areas. That’s all you really need to know.

A lot of people think about HDR’s as these overdone, unnatural photos, which have nothing to do with reality. I call those photos with a “HDR look”. They can be created from any photo, and have really nothing much to do with HDR. I have seen good ones, and bad ones, it’s a lot about the viewers´ taste and preference. Also some of the HDR results, can be created without using the HDR technique. It’s again the photographers decision what he uses (like he can use a Canon or a Nikon camera, but the result is still a photo :) )
There is a certain aversion against HDR photos. But everyone should understand, that HDR is a technique, a part of the final photo. And it depend’s on the photographer, how the final photo looks. HDR on it’s own does not make a good or a bad photo.

I get quite a lot of questions, if my photos really are HDR’s. That’s because people expect that the HDR mentioned look from them. But that’s not my goal. My goal is to find the sweet spot, between artistic and realistic photos, so I like them.
Old Bridge

Why HDR?

Again, this is very simple. You can’t always set up your light sources. Especially when you only light source is the sun. HDR gives you the option, to capture all the available light and then expose all parts of the photo as you like.

It removes some limitations all current cameras have, and gives you more to work with in post-processing.

At the end it’s your decision. Same as with all photography techniques, starting with HDR is easy, creating a good looking HDR photo is quite hard. So don’t be discouraged, if you can’t get the results you want. It take time and practice.

Feel free to ask any questions and if you find some errors or problems with my HDR tutorial, please let me know.

So lets start with how to take your photos for HDR

And here are few examples of finished HDR photos:
The stunning view
St. Martin's Cathedral at night
Inside the Matthias Church
The blue sunset in Prague
Relaxx and enjoy the sunset

So now you have your photos and your tone mapped image. Yous should still keep the original files, as you will need them for few steps. This part is not a step by step one, as you only need to do some parts, based on the photo.

Loading your photos into Photoshop

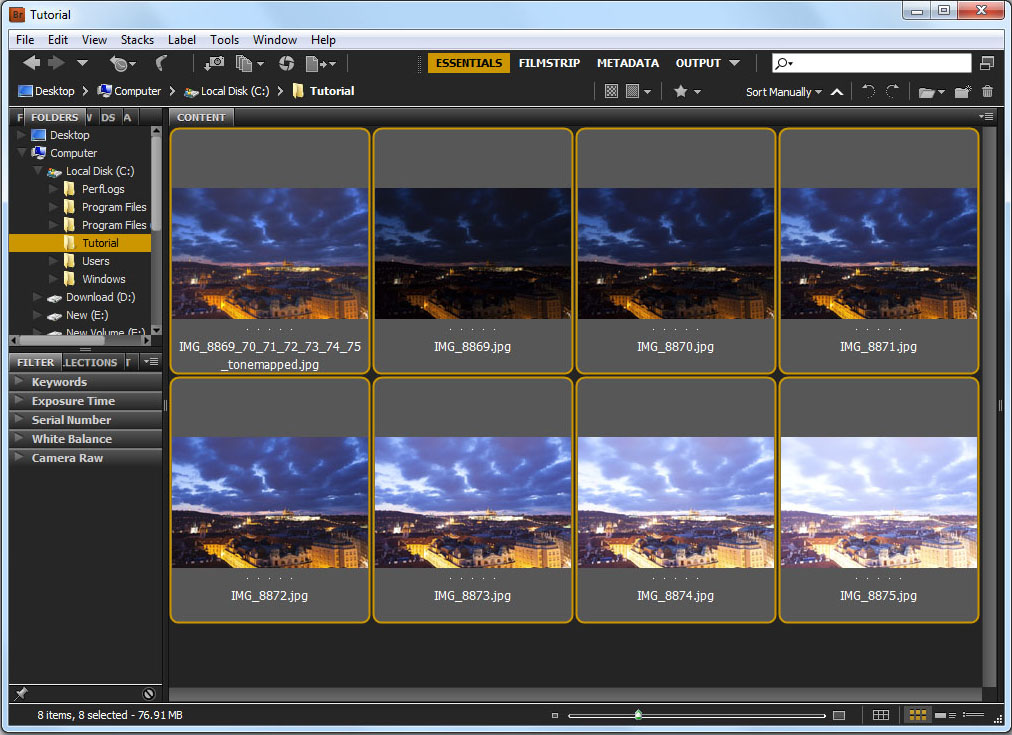
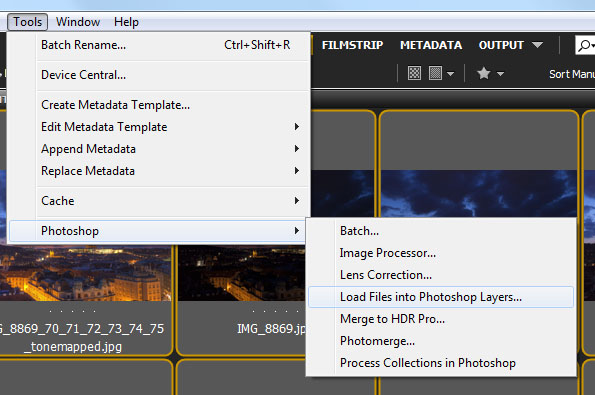
A lot of the corrections require that you load your original brackets and the final tone mapped image into Photoshop. The quickest way to get your files into Photoshop is to:

  • open Bridge
  • go into your work folder
  • select the source files and tone mapped image
  • choose tools-> Photoshop->load into layers
 ->  ->

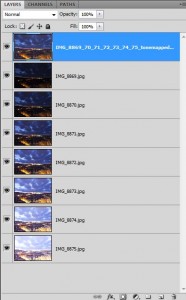
now you have all your photos in Photoshop and loaded into separate layers. I suggest you move the tone mapped image on top of the others.

You don’t have to load all of your source images, just the ones you will probably use (the ones, from which you need parts to correct problems in the tone-mapped image). I load all, for me it’s easier like this.

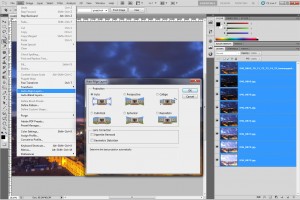
If you took your photos handheld, or they just dont allign completly, you should align them in Photoshop by:

  • selecting all layers
  • choosing  edit->Auto Align Layers -> select Auto -> OK

This works very well, but not always.  Simple way to check your alignment is to change the opacity of the top layer, or just turn it on/off, so you see if the photo moves.

What you need to correct

Each photo is different, but most of the time you have to correct the same problems. The main areas you need to focus are: alignment, movement, overexposed areas, grey whites, very dark areas, colors, halos, noise, sharpness, over-saturation and strange trees.

Some of this is corrected in Photoshop, but some are easier to correct even before, mostly in Photomatix. Also one thing to remember. The better the original brackets, the less you need to correct.

Alignment

If your photos don’t align properly, it is a big problem for HDR. It creates shadows, ghosts and the whole image looks very soft.  The main reason for bad alignment is camera movement when you took your shots. It happens all the time when you shoot handheld, but can also happen when on a tripod.

To get a better alignment you can use align in Photomatix – here you have three options

  • no alignment – when you used a tripod and you are sure it didn’t move, also when you have a big moving subject in your photo (like fast moving clouds), selecting no aligment can prevent Photomatix to align based on that subject
  • correcting shifts – should be used when shooting from a tripod.
  • by matching features – when shooting handheld or when the correcting shifts is not enough. Usually creates very good results.

But if Photomatix is not enough, you still have other options. You can try to:

  • combine photos into HDR using Photoshop. Just select the brackets in Bridge and choose Tools->Photoshop->Merge to HDR pro. Photoshop is very good at aligning photos, so it can sometimes create better results. Just save the file it creates as a .hdr file and then open it in Photomatix to continue.
  • don’t use all your shot. If you took more shots (5+) it can happen that one or more of them are not aligned with others. For instance little wind while you were taking your shots can cause this. Just look through them and if you see one that is blurry, don’t use it. The information in all other shots should be enough to create a good HDR photo.
  • use only one RAW to create your hdr. By using only one, no alignment occurs, so no problems can occur
  • create a misaligned HDR from all brackets and a HDR from a single RAW and merge them in Photoshop. Just align them as best as you or Photoshop can, and then by using layer masks  correct the parts you need.

If you really can’t create a nice aligned HDR, just use the single RAW method. You can try to mask in part from the original shots, to cover places where it isn’t aligned properly, but this takes a lot of time and the result can vary. I suggest you get a better tripod next time :)

Movement

A lot of people struggle with this, but to correct moving subjects in your HDR photos is actually very easy. There are two main approaches you can try, I use them both.

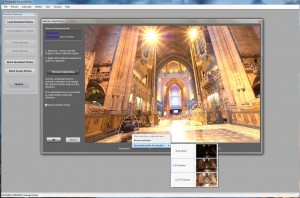
  • use Photomatix ghost removal. Select the manual method and choose which areas are ghosted. This works much better if you have more than 3 brackets. You can also use the full automatic method, but the results here are mixed. They can be very good, if you use a lot of brackets (5+) and very bad if you use only 3. The manual works mostly better.
  • use layers in Photoshop, to mask in parts of the original photos
Look at this example. While I was taking the photo, people walked into my shot. So if I only merged the shots, I would have ghosts there (first image). But as I selected them out in the photo using the manual method there are not visible in the final HDR. You will also notice that I had to choose which image I want to be used, as Photomatix selected the one with the person. Just right click on the area and choose the bracket you want.
 ->  ->

By masking using Photoshop layers you can correct many problems you have in your final HDR. You have to place your layers in an order, where you have your tonemmaped inage on top, and the source image you want to use parts of under it. Then select the top one and add a layer mask (the small icon in bottom right, which looks like a grey square with white circle in it). On the layer mask, white means the top layer is used, black the bottom. Grey is a mixture of both. Using a soft brush, at around 20%-30% opacity, start brushing on the layer mask, to reveal the original photo. Continue until the problem is corrected. Add you brush strokes softer on the sides, to create a better mixture of the two layers. If you went two much just switch to white color and brush over the same area, to remove from the mask. Don’t forget to check that you have the mask selected. If you have the photo selected you will paint into it instead of masking.

My favorite approach is to mask in what I need with a stronger brush (40%-50% opacity) and then switch to a softer (15%-20% opacity) white brush and soften the corners of the brushed area, to create the soft transition.

A lot of times you have to use parts from multiple source images (even all).  Here you have two approaches you can do:

  • after masking in one of the shots, merge it together (select both and Ctrl + E) with the tonemaped image into one layer, and then continue as before.
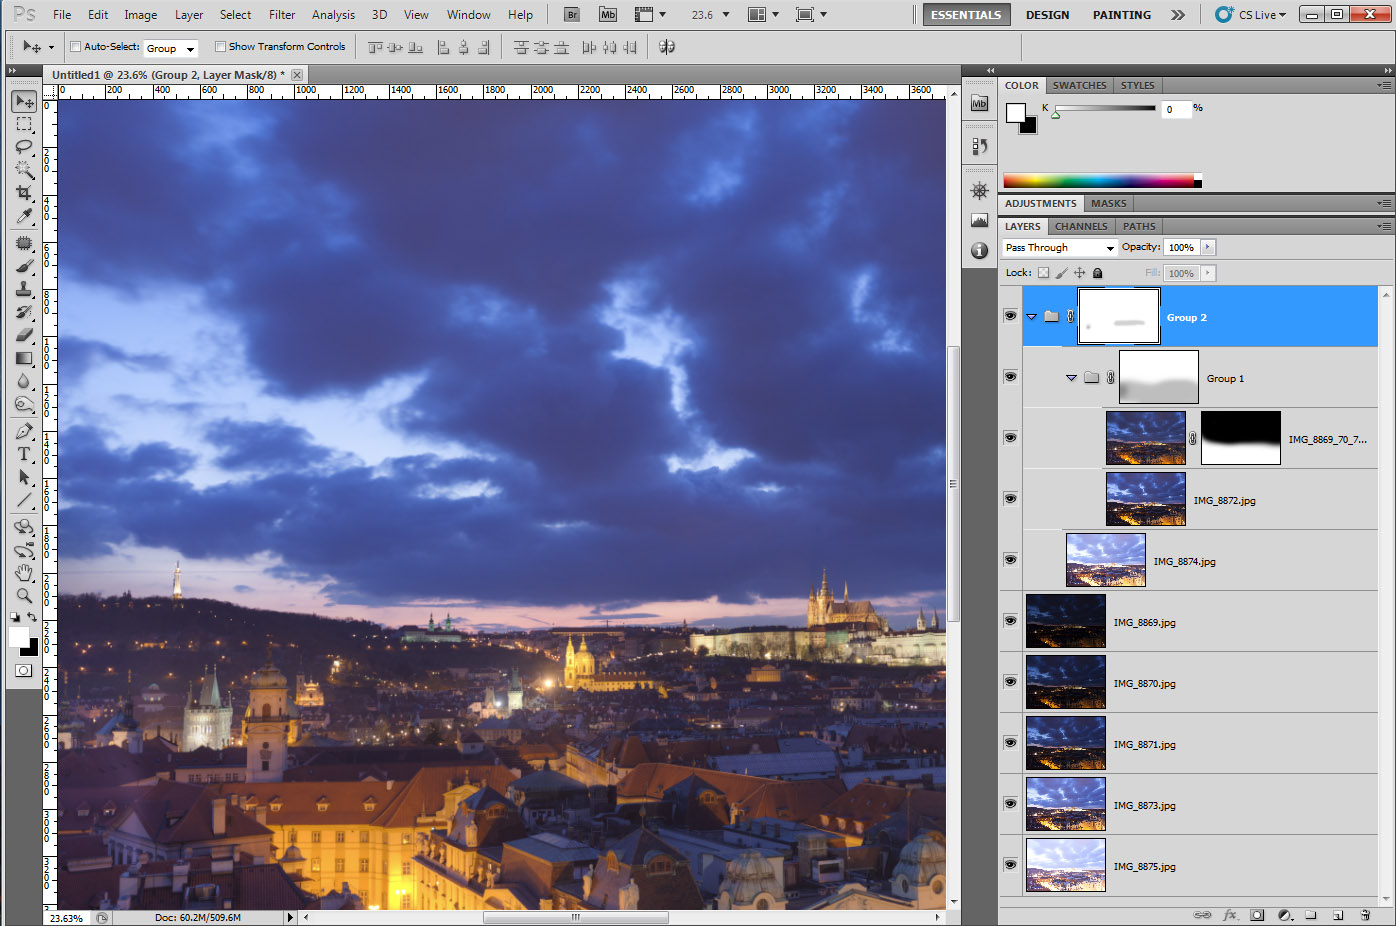
  • group the two layers and then create a new layer mask on the group (check out the screenshot). Like this you can go back to layers you already worked on.

Here you can see how I removed the whole sky from one of the original shots, as the clouds were moving to much. I prefer to group layers, as I go back and forth between different layers and sometimes remix them in between each other.

This layer method of masking is simpler, when you have more brackets at your disposal, as you can find easily one that matches your tonemapped image. In the case none of the ones you have match it sufficiently, you can perform few tweaks on the source image before masking it in. For instance changing brightness, contrast, exposure and other photo tweaks can help.

You can even use a single raw HDR as one of the layers, or a tweaked image from Lightroom.

Overexposed areas

It can happen that you just don’t have enough brackets, to cover the whole range. Tone-mapping usually creates very rough edges around this area and can make this areas dark, so you should always try to correct this. If you are aware of this before you start your tonemapping process, you can try underexposing your darkest photo in Lightroom by one or two stops, and using it as an additional bracket for Photomatix.

Other option is underexposing it directly in Photoshop and then using layers masks correcting the affected area.

I tent to try shooting brackets, so I have no overexposed areas at all. Only time when this is not possible, is when you shoot into the sun. Just use one of the original brackets to soften the areas, or to completely replace it.

Grey whites

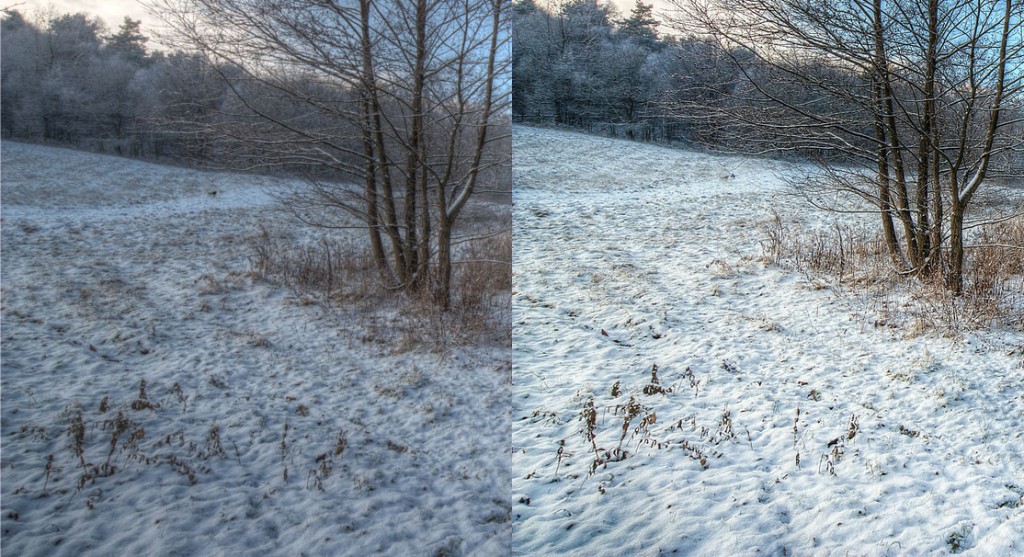
Overall white areas are a problem in HDR. The tone-mapping process tries to get details in them and so makes them look grey and dirty. Masking one of the original shots here is really a must. If you have a white area, white car, snow, or other white object in the photo, you should always make it brighter.

For instance, on the right you can see a winter photo, directly from Photomatix, and after masking and level adjustment in Photoshop.

Very dark areas

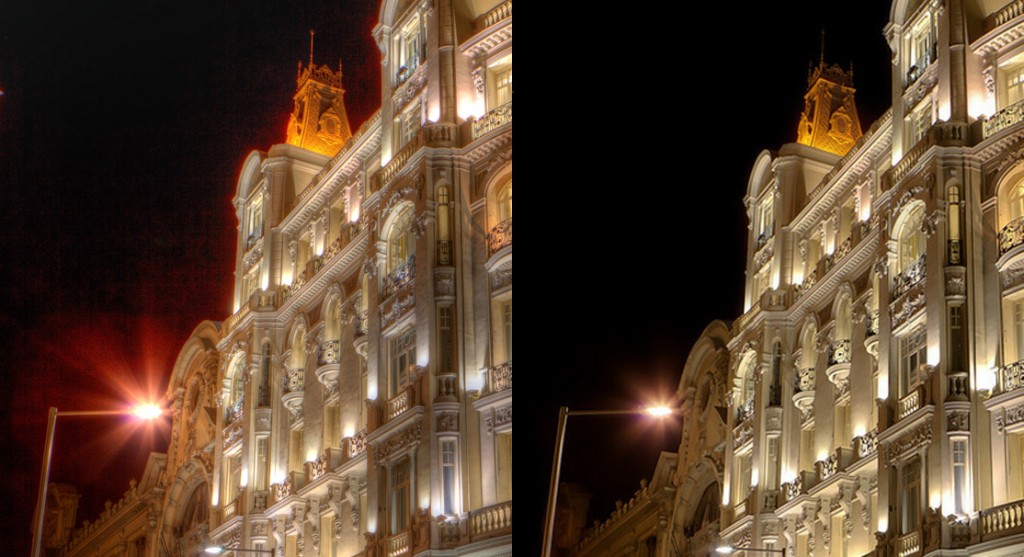
The opposite of overexposed areas. Just use one of you lighter brackets to make them lighter.  Also Photomatix tends to create detail, where there is none. This usually results in strange artifacts, either red or purple, in your tonemmaped images. The only way to correct this is to mask the one of the original shots back in.

You will see something as in the picture on the left and you have to mask that part. This happens only if you have an area, for which all your brackets are pure black.


Halos

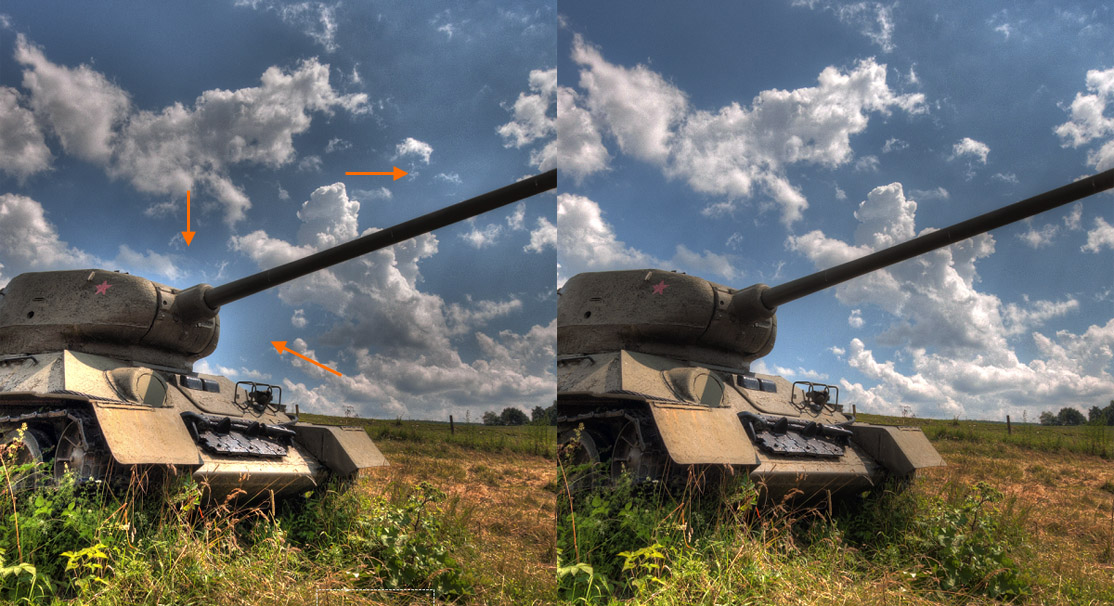
Or also known as the blue sky halos. I really suggest trying to get rid of them already in  Photomatix. By lowering strength, using higher light smoothing, smooth highlights or luminosity, you can get rid of most of them.

But if it doesn’t work you still can choose one of your brackets, with the best sky and mask the whole sky into your final image. Trying to darken the halo is really hard and the final result are usually not good enough.

The photo on the right is just an example to show how halos look. I haven’t had this problem for a long time.

Also having more brackets reduces the change that you will get the halo. Having softer transitions between them creates better results here.

Noise

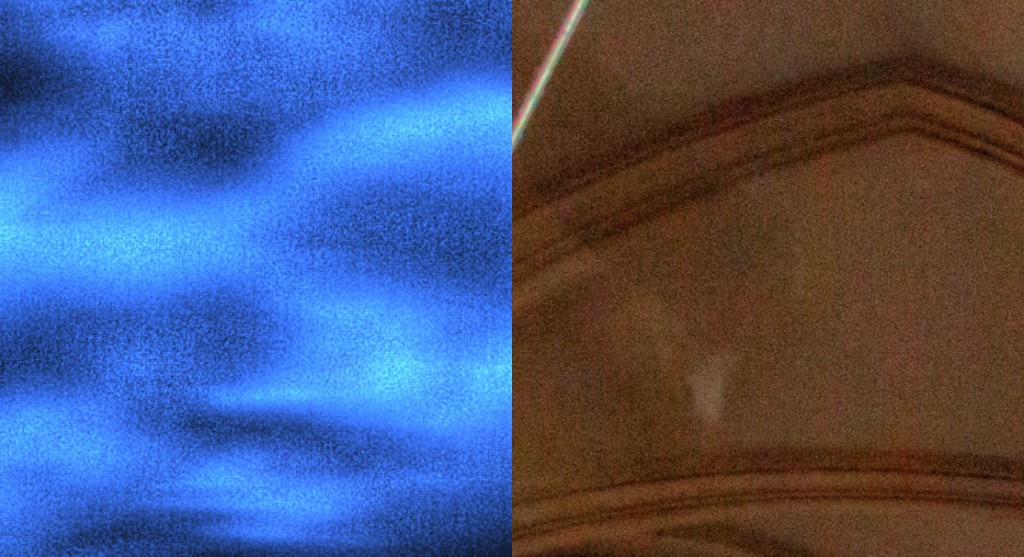
Noise gets worse in HDR, as the more noise you have in your brackets, the worse it it in the final image. But you should distinct between noise and grain. If you look at your photo in detail you will see the difference. Grain is crated by having a high Strength and Detail contrast in Photomatix. It just tries to add more detail to the photo, and mistakes the noise for detail, creating so grain. It’s usually very visible on cloudy photos. Noise is created by your camera, while taking the shot.

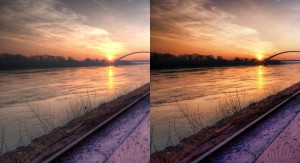
Grain vs Noise looks something like the image on the right.

To get rid of the noise, you should always shoot at the lowest ISO possible. Also having more input brackets can give you better results. For instance with the 5D mark II at ISO 100 and 7 bracket, I have almost no noise in my final HDR’s.

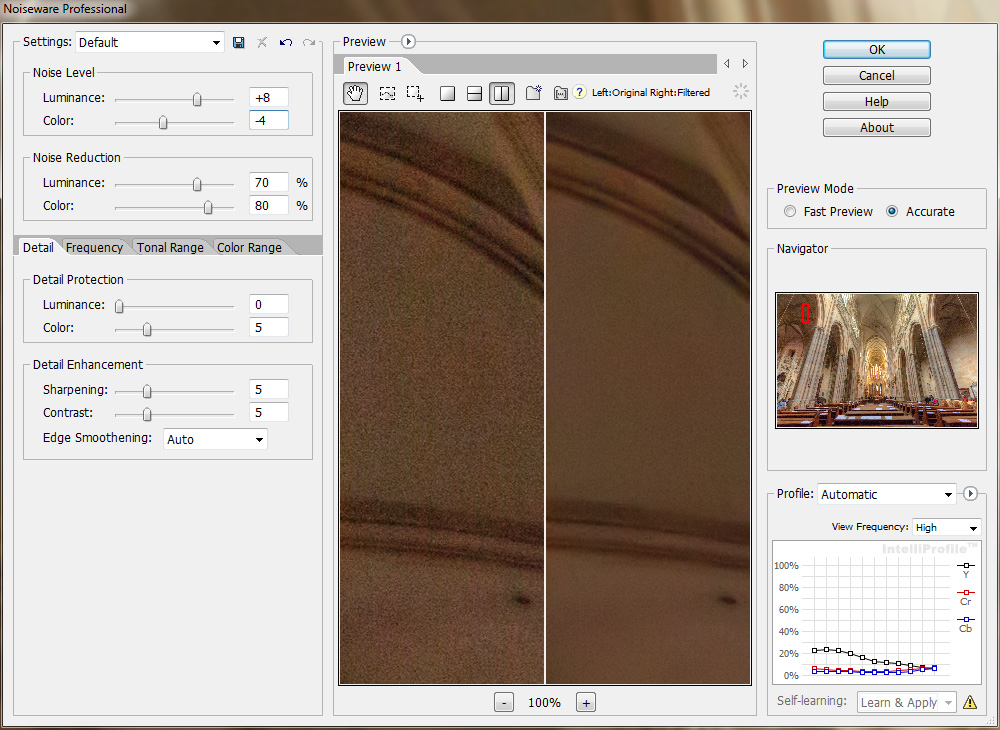
One of the best ways to remove noise is to use Noiseware Pro. This Photoshop plugin is in my experience the best in reducing all noise. If you use it, it should be done in two passes. Once for the sky and once for everything else. This is because we want to keep details in the structures, but don’t need so much in the clouds.  So a higher setting for the clouds is still acceptable.

My usual setting here are quite low. I select the default preset and start with luminance around -7 and color at -20 (you usually don’t need color noise reductions). This settings are usually enough when you use ISO 100. But for instances like here, where the ISO was 2000 I had to go much higher.


Sharpness

Another very common problem with HDR, is that the photos are just not sharp. Even when your original photos were sharp, the final one isn’t. There are multiple ways you get get the sharpness back.

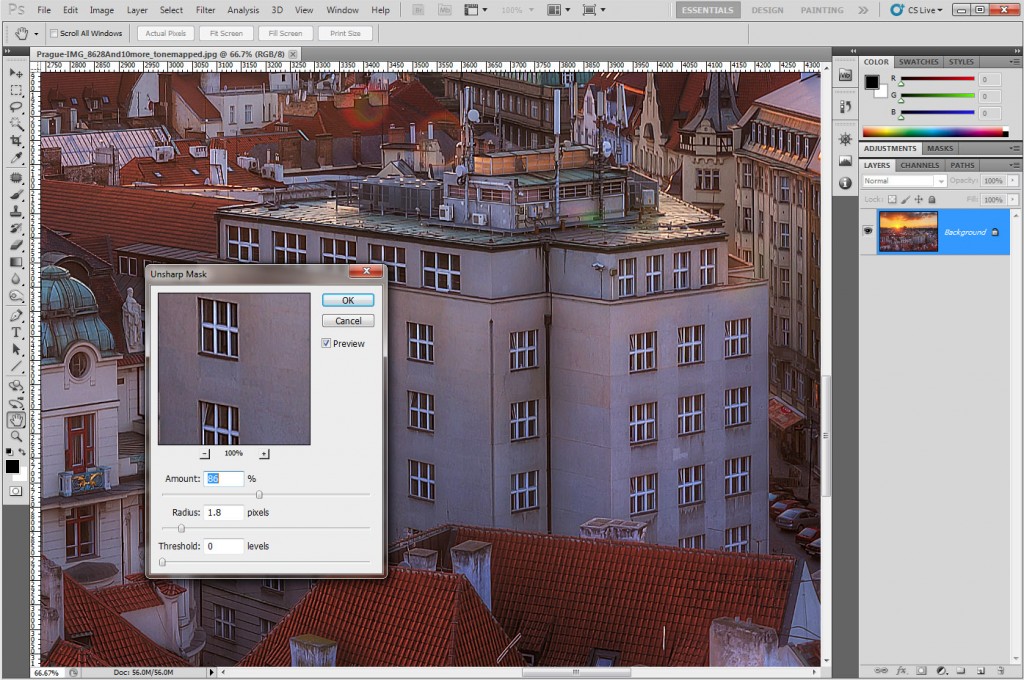
Unsharp mask in Photoshop, the easiest and for a long time  my most favorite way. Just create a new layer by merging all your layers (Ctrl + Alt + Shift + E) and on this layer use Filters -> Sharpen -> Unsharp Mask. My standard settings here are 100%, 1.6 to 2 pixel radius and 0 threshold. I do this on a separate layer, because I don’t want it on the whole image. For instance you should not sharpen the sky, as it created additional noise. There also is a second approach to unsharp mask, where you choose setting of 10% and a high radios at around 40 pixels. This gives the photo a little different look.

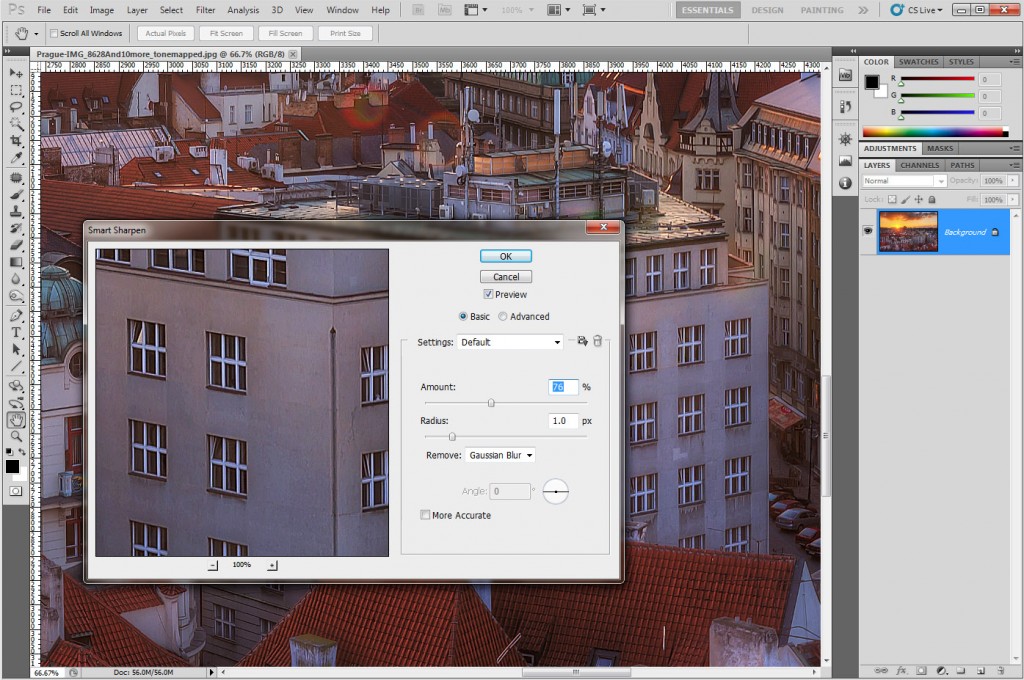
Smart sharpen is another filter in Photoshop. It is popular by some fotographers and it can create similar results to unsharp mask. It can be found under Filters -> Sharpen -> Smart Sharpen. I don’t use it very often but my settings here are around 80% and 1px radius.


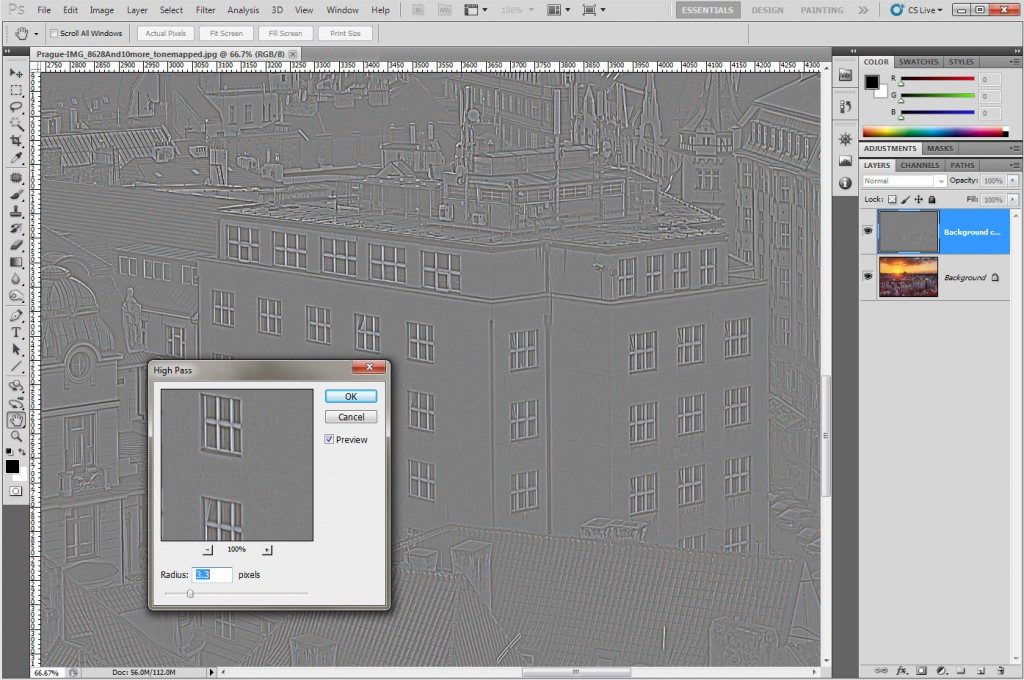
The high pass method is a very popular method, done by a lot of HDR photographers. What you do is to sharpen is:

    • duplicate the layer
    • use Filter -> Other -> High pass on this new layer
    • play a little with the number of pixels, until you see the detail you want to have i the final photo. Smaller number work well here (2-4px)
    • set the layer to soft light, overlay or luminosity (choose one that works best with your photo)

There are also dedicated sharpening filters, notably the Nik Sharpener, but I will cover that in the next part which is all about plugins.

Too much saturation

Not everything in a photo has the same level of saturation, so it can easily happen that something is over-saturated. For me it usually happens with bright red objects. There are two aproaches you can go here. You either:

  • mask the object back from one of the original brackets
  • create a hue/saturation layer and adjust the sliders until you are satisfied with the color. I suggest you also use the layer mask, so this saturation change only effects the area where you need it.

Dark clouds

You can see this in so many HDR photos. You just can’t have dark clouds during a sunny day. It just looks very unrealistic. It’s fine if you have a stormy or a blue hour shots, but never during a sunny day with a blue sky. Just use masking to brighten them back from one of the original shots.

You will also notice, that when you brighten your clouds, your photo will just look better.

Messy trees and strange greens

Having trees in your photos, especially when there is no wind, is great. But when they crate one big green mess, they no longer looks so great. As the HDR process removes most of the shadows, it tends to flatten trees. So you should remix them with the original shot, to bring back their texture.

Also the green color on trees and other plants can look really strange if you were shooting during a sunny day. Toning down the yellow color using hue/saturation can give the back a more natural look.

How to use Photomatix Pro

I use Photomatix Pro in this tutorial. There are other HDR software, that can be used to combine photos into HDR, but Photomatix is the most popular and widely used (and also my favorite). It can create stunning results if used properly. If you don’t have Photomatix, you can get a full featured trial version here http://www.hdrsoft.com/download.html or it can be also bought there.

If you want to buy it, don’t forget to use the Photomatix coupon code “HDRSHOOTER” for a 15% discount.

Preparing your shots

So you have your shots, and you have them in Lightroom (you can do this is many other programs, but I use Lighroom 4 here). You need to correct few problems before starting to combine the shots, as tone maping can make the more visible.

To correct the photos, go into develop mode and select all the photos in your series:

tutorial-select photos

Correct chromatic abberations

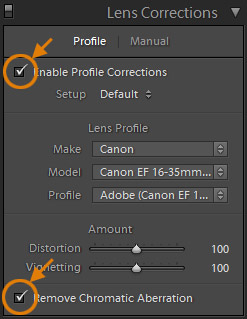
You want to correct the problems on one of the photos and using sync  copy the same settings to all other photos. You should always correct the chromatic aberrations. This can be done either  manually, or let Lightroom do this for you.

tutorial-lens correction

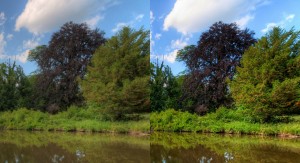
You can also turn on Enable Profile Correction. Lightroom will then remove some of the distortions in your photos. From my experience it does a really nice job.

(Small update/note: I have found that removing distortion can create color banding in the final HDR. Usually when you have a clear blue sky. It you see this happening, use photos without the profile correction enabled. You still can do the correction on the final HDR.)

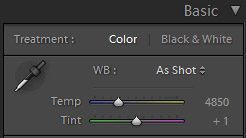
tutorial-white balance

Correct white balance

Based on the photo, if you need to correct the white balance, do it now. If you change the temperature in Photomatix,  and then you have to merge your photos with the tone mapping result you color will no longer match up.

If you took shots in multiple series, not in a singe AEB, you also need to check that white balance is same in all photos. It can happen, that the camera meters different shots differently, and you get different temperature and tint on them. I you selected your own white balance on the camera, not AWB, or you already corrected the white balance, you don’t have to check this.

tutorial-noise

Correct noise

The last thing I do sometimes in Lightroom, is to correct the noise a little. Especially if you used ISO bigger than 400 this can help a lot in the final result. Same as with other problem, the HDR tone maping process will make noise more visible. So not having too much of it to start with makes the whole process easier.

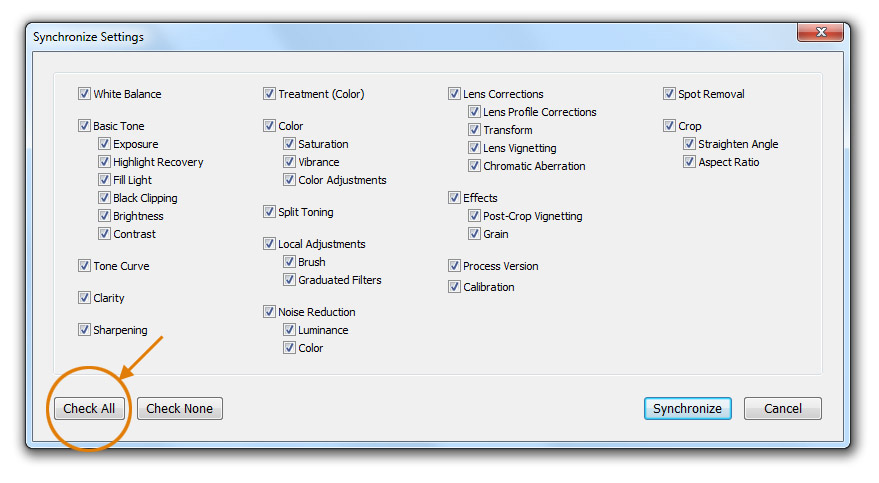
Synchronize settings

After this is all corrected, synchronize the settings to all photos in the series. Just press sync in bottom right, then check all and synchronize.

tutorial-synchronize

Export brackets

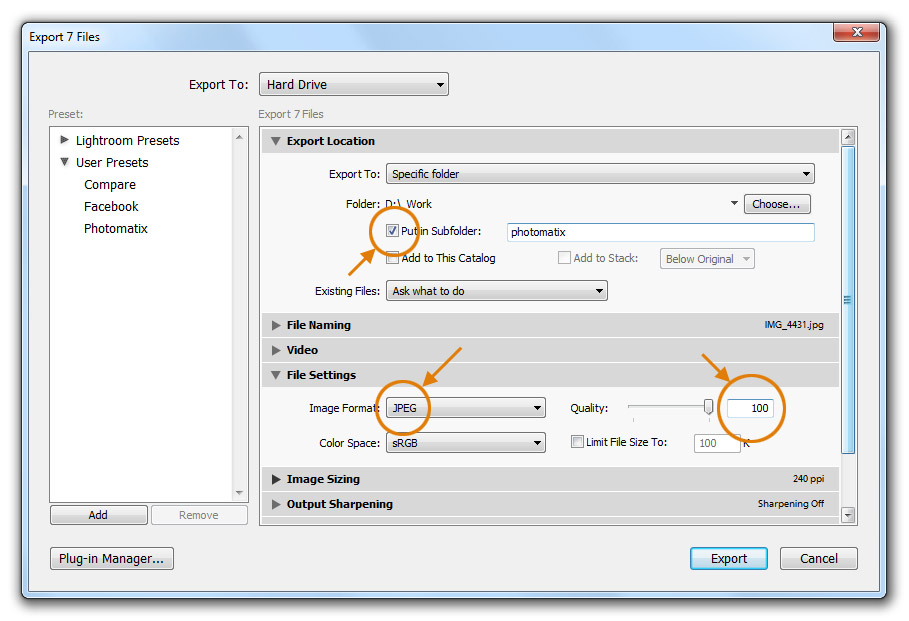
Now you can export you photos as 100% quality Jpeg files to be used in Photomatix. You can also use Tiff files, but it will take you computer longer time to process and you will see little or no difference in the result. I export the files into a work folder, from where I delete them once I’m done. I really suggest creating a preset for this export, as it’s something you will do a lot.

tutorial-export

A plugin can be used to export directly into Photomatix from Lightroom. I don’t use it, as I close Lightroom before I start combining my shots. Lightroom takes really a lot of computer resources, when it’s running.

Combining in Photomatix

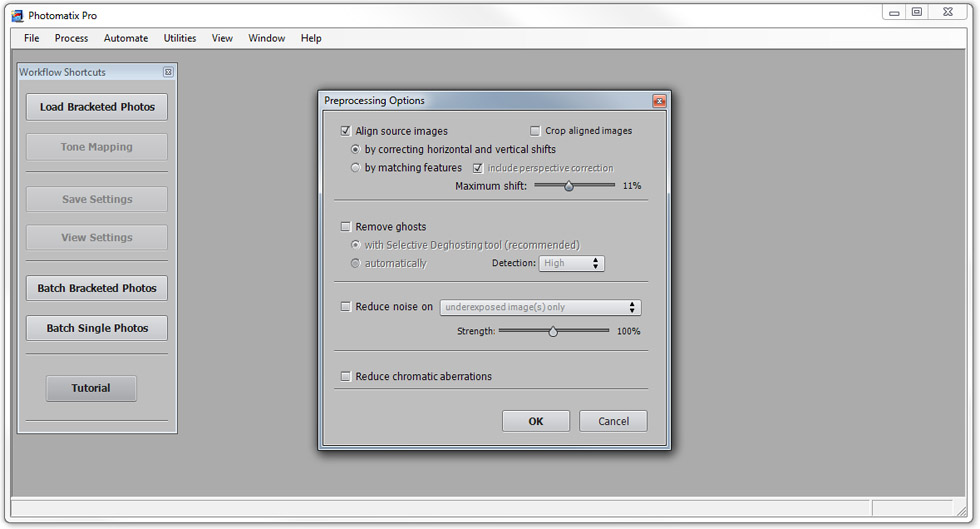
Open Photomatix Pro and select Load Bracketed Photos. Drag and drop your exported images into the dialog or browse for them and choose OK.

Now you have preprocessing options in front of you with the following checkers:

  • photomatix-processingalign source images – use the correcting shifts when you used a tripod, use matching features when you shoot handheld. Don’t select that you want to crop. Even when you used tripod, sometimes you have to select to align by matching features. This can be for instance when there was a lot of wind or you were standing on a busy bridge. Also using a bigger maximum shift can help you, if you took handheld brackets with a wide-angle lens. It can deal with the distortion better that way.
  • remove ghosts – turn on when you have moving objects in your photo Always use the first option. It gives you the option to select the areas you want to deghost. The automatic option never worked for me. It always created really strange results, like it didn’t used all of the brackets.
  • reduce noise – you can use this if you have no other options to remove noise. But there are better Photoshop plugins available which do it much better.
  • reduce chromatic aberrations – if you followed this tutorial, you don’t need this to be turned on, if you didn’t, turn this on

Select OK

Tone mapping in Photomatix

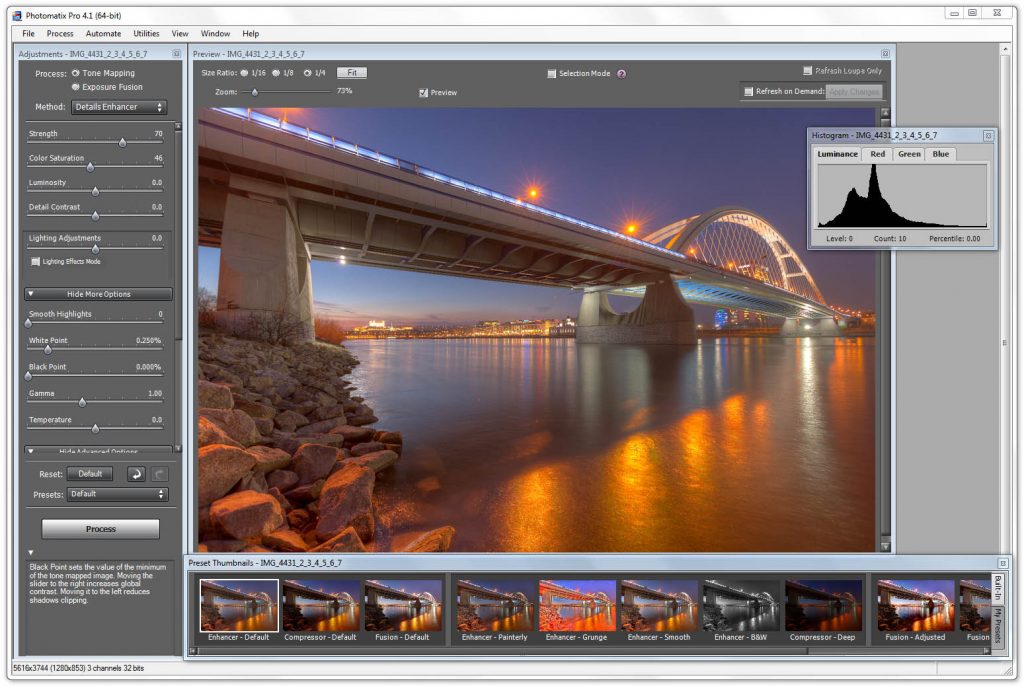
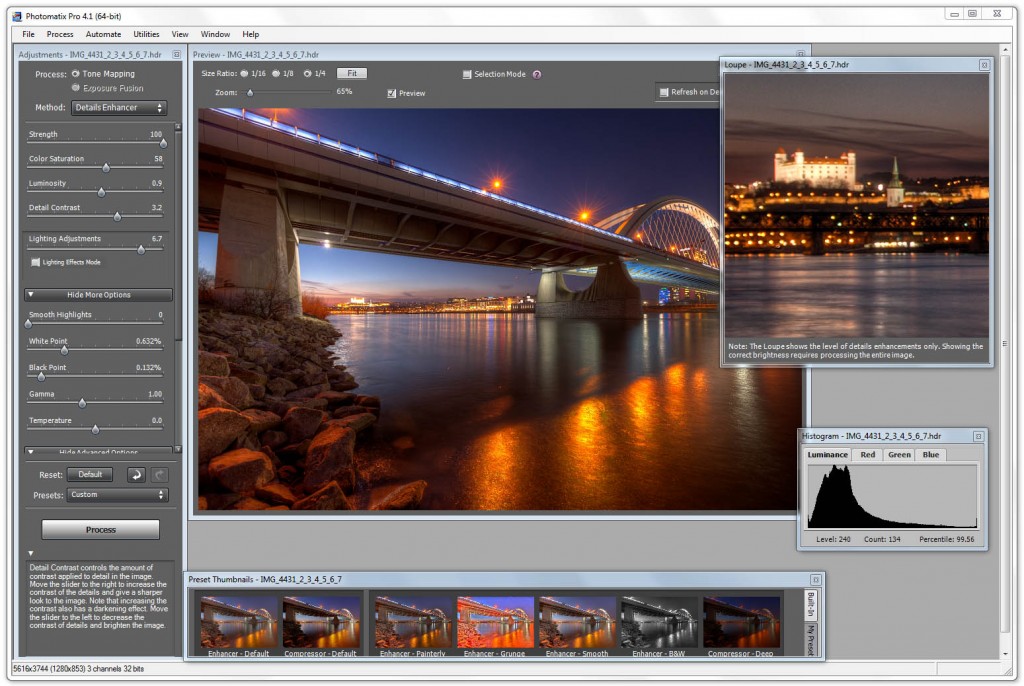
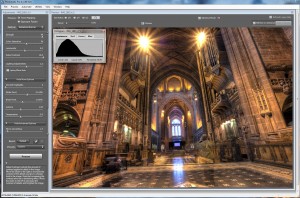
Now you have all your options to tone map your HDR photo. I skipped the 32bit view, as it has no real use here.  I always chose Tone Mapping and Details Enhancer as the method.

When your photos are combined, you get your HDR with the default settings. When you are a first time user, its good to start from the default settings. As you get more used to Photomatix, you don’t need to reset anymore, as you will know what to expect.

tutorial-photomatix default

You have the following settings:

  • Strength –  the higher the number, the more HDR look you have. It adds more detail and contrast to your photo. It also gives it a more unnatural feel, so if you like more realistic look, avoid 100 here. I usually use a settings between 70 and 100 here. If you compare the photo at strength 0 and strength 100 you see that a lot of detail is added as you go higher.

tutorial-strength0 tutorial-strength100

  • Color saturation – If you want to have too much colors in you photo, you can add it here. But for most of the times, leaving it at 50 will work nicely. Really move it only when you see the need for it. I stay somewhere between 45 and 65 here.
  • Luminosity – Makes the dark part of your photo lighter. Great to show more details. A high setting can make you photo look a little washed out, but a higher black point or more contrast later on can help a lot here. I usually have this anywhere between 0 and 10, based on the photo. Also note that a high value here can make you photo look more like a drawing than a photo. For a more realistic photo, use a smaller number. If you compare this setting at -10 and at 10 you can see, that there are absolutely no black areas in the +10 image.


  • Detail Contrast – ads more contrast to details in the picture, using higher values here will pull out more contrast in your photo, it also makes the photo darker, so counter it with luminosity or white point. I usually stay anywhere between 0 and 10 here, it really varies.
  • Lighting Adjustments – moves the light in the photo from the light areas to the dark areas. So the lower you go here, the more are the shadows lighter and the light areas darker. So it’s more unnatural (more artistic). The higher you go the more natural the photo looks. I’m usually between -1 and 5 here. I never use the Lighting Effects Mode, as I feel it gives me lees control of the final look. If you compare this setting at -10 and 10, you can see how the bridge becomes lighter and the sky brighter at negative settings. I would never use a very low setting for a photo with a sky in it, but it can work really well for an interior shot, to give ti more detail.


  • Smooth Highlights – rarely used by me, stays at 0. This smooths out the lighter areas in you photo, making them lighter, less noisy, but usually removes a lot of detail. Only sometimes helpful, when you have a lot of halos around objects in your photo.
  • White point – chooses what is still considered as pure white in you photo. If you have a lot of overexposed areas in you photo, use a lower number, if you photo is to dark use a higher one. I stay between 0 and 1 usually. You should check your histogram when changing this, so you don’t loose any detail because of a very high white point.
  • Black point – same as white point, moving changes, what points are considered pure black. This adds  nice contrast to your photo, so it shouldn’t be left at 0. I have it somewhere between 1 and 2. You should check your histogram when changing this, so you don’t loose any detail because of a very high black point.
  • Gama – the overall brightness of the photo. If you photo is too dark, it’s sometime better to change this than luminosity, as it stays more realistic.
  • Temperature – makes your photo cooler or warmer. Quite rarely used by me, as I think it’s better to correct the temperature in Lightroom, before Photomatix.
  • Micro-smoothing – cleans out the photo, smoothing it out on smaller scales. Can help a lot with noise, but can also remove a lot of detail. Keep it low, arount 2 to 4 here.
  • Saturation Highlights – adds more color to the lighter parts of your photo. I have never used this option.
  • Saturation Shadows – adds more color to the darker parts of your photo. I have never used this option.
  • Shadows Smoothness – same as highlight smooth but for shadows. Also this I have never used.
  • Shadows Clipping – cut out dark areas, so can help with too much noise there. I use Photoshop to correct this, so I have never used this option.

The biggest effect on you photo will have strength and lighting adjustment. Other than that, I change only luminosity, detail contrast, black and white point. Most of the time, the other options can stay at default values.

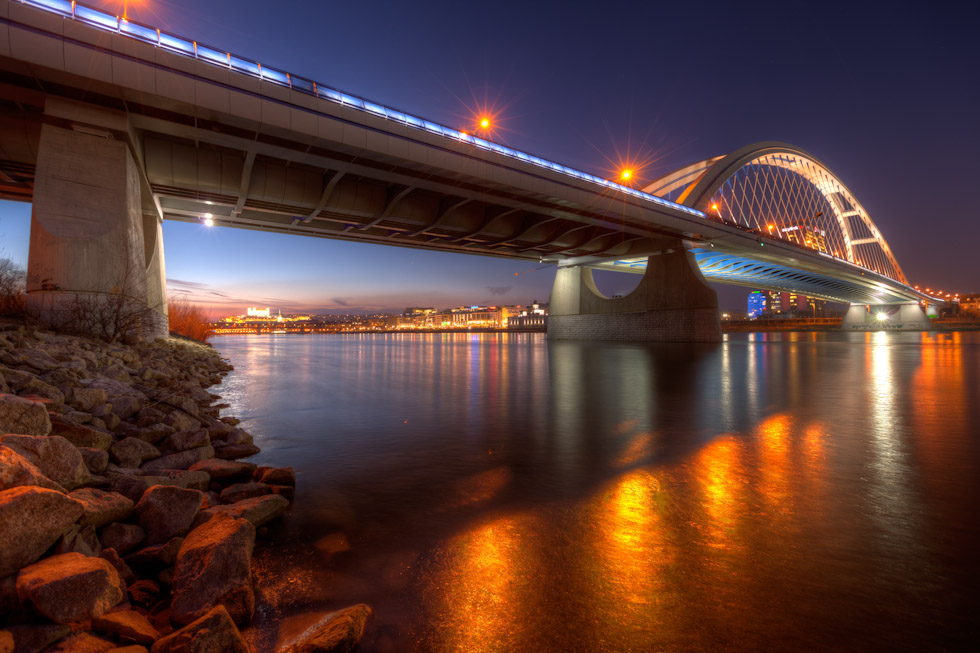
So I set up my settings for this image, to get to the result shown to the right

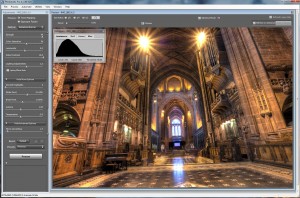
Be careful with the loupe. It shows you the detail, not the brightness, so it’s not the same as a processed image.

When your done, select process and then save you image as a full quality JPG (you can go with a TIFF if you want, but most of the time you will see no difference)

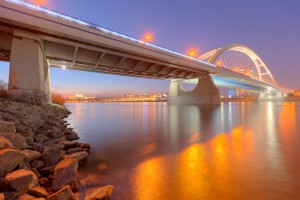
So my final tone maped image looks like:

It’s already quite good, but still there are few problems which need to be fixed (noise, sharpening, some overexposed areas, movement in the water and similar). This will be covered in the next part of the tutorial.

A note about all the suggested numbers. If you read a tutorial from somebody else, you will get a different set of numbers. This is because everyone likes a different look. You should try them for yourself and see what suits your taste and your photographs.

Double tone mapping

One technique in Photomatix, you can try out, is the double tone mapping. What you have to do is:

  • load you photos into Photomatix
  • do standard tone mapping steps on it
  • process your photo, so you are back in the main selection of Photomatix, but still with the photo open
  • select tone mapping one more time

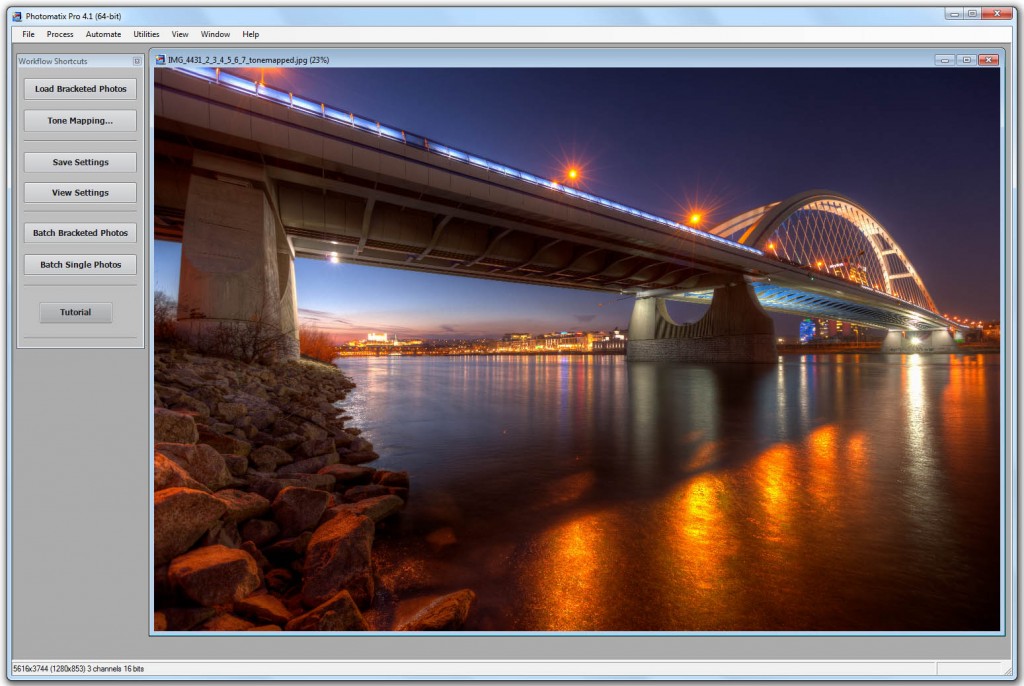
So you select tone mapping when you are back in the screen shown to the right

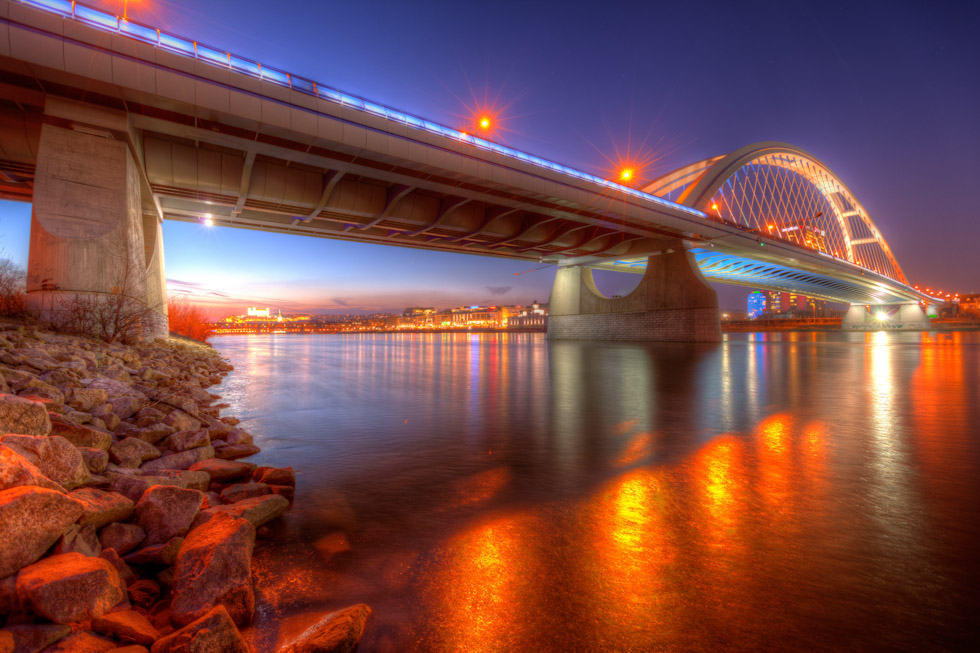
When you do this, Photomatix will tone map the already tone mapped image once more. This will give it a very grungy, super detailed look. Now you can again play with all the sliders, to modify it. There are no preferred values, but usually going down with fill light gives a better result.

When you are done here, just click process and then save your final double tone mapped image.  I personaly save both, the normal tone mapped and also the double tone mapped image, and mix them together in Photoshop.

When this photo is double tone mapped with the same settings, you will get this result

This is not a really good example for double tone mapping, as it doesn’t fit this image. A much better use for this technique are images with a lot of detail, like stone wall, church interiors an similar. For instance this one is a much better, an you can see how the stones have much more detail. You can even go further, and give it a more grungy look, but I don’t want to do that.


HDR from a single image

You can use the HDR process on any photo you take. Either it is a multi-bracketed series or a single one. You can even do it on a single photo if taken in JPG format, but the results are not so good, as the information you need is just not there.

There are two ways how this can be done. You either:

  • split your photo into three separate ones by changing the exposure to +2,0,2 respectively, and then export each setting as a separate photo. Then continue the same way as having multiple brackets.
  • open the RAW file directly in Photomatix and continue with tone mapping as with multiple brackets

I personally prefer the first option, as it gives me the possibility to do some corrections before tone mapping (chromatic aberrations, noise reduction). There is no other big difference between these two methods.

What to do if you photos don’t align properly

There are multiple approached one can try when the brackets don’t align properly in Photomatix. I use:

  • create the tone mapped HDR from a single raw, usually the middle exposure
  • create the tone mapped HDR from a single raw and correct all problems (like overexposed areas) in photoshop from the remaining brackets
  • combine the brackets in Photoshop and save as a .hdr file, without any tone mapping. You can then open the file in Photomatix and tone map it there.
Continue to the next part, which focuses on problems in HDR photos, and how to correct them.

Returning to old places

Capture HDR photos

So first thing first. If you take a bad photo, HDR will not help you. Composition is really the most important part of a photo. You can have a great subject, with great HDR treatment but without a good composition the photo will not work.

If I want to have better composition I use my tripod. Why? Because it slows me down, and I think more about the photo.  Also I don’t have to crop much, if I take more time to setup my shot.

So always first think about the composition, than about the post processing.

In this HDR tutorial I will show  all the steps on this photo, with few examples from other ones.


My setup

What do you need?

The only thing you really need for HDR photos is a camera. Any camera will do fine. You can use HDR process on any photo you take, even with your phone. But the results may wary based on the camera you use.

So in the best case you need:

  • a camera – any camera with manual mode or AEB (Automatic Exposure Bracketing) will do, if you want to take HDR’s handheld AEB is a must. I will assume you have a DSLR in the tutorial, as there is little to set up on a compact camera. If you want to create HDR’s from a single shot, you can use any camera.
  • tripod – you can make HDR’s handheld, but to get the best results you need a tripod.
  • cable release – not really mandatory, but can help
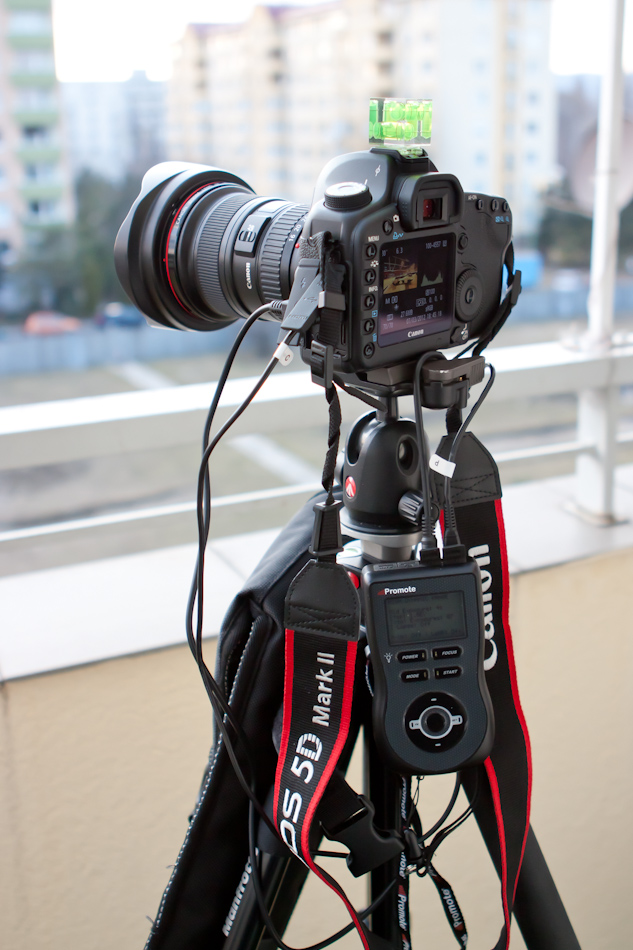
On the left you can see my setup, but that’s after two years of taking HDR photos, I started with a compact, taking handheld photos.


Taking the shots from a tripod

Bracket settings

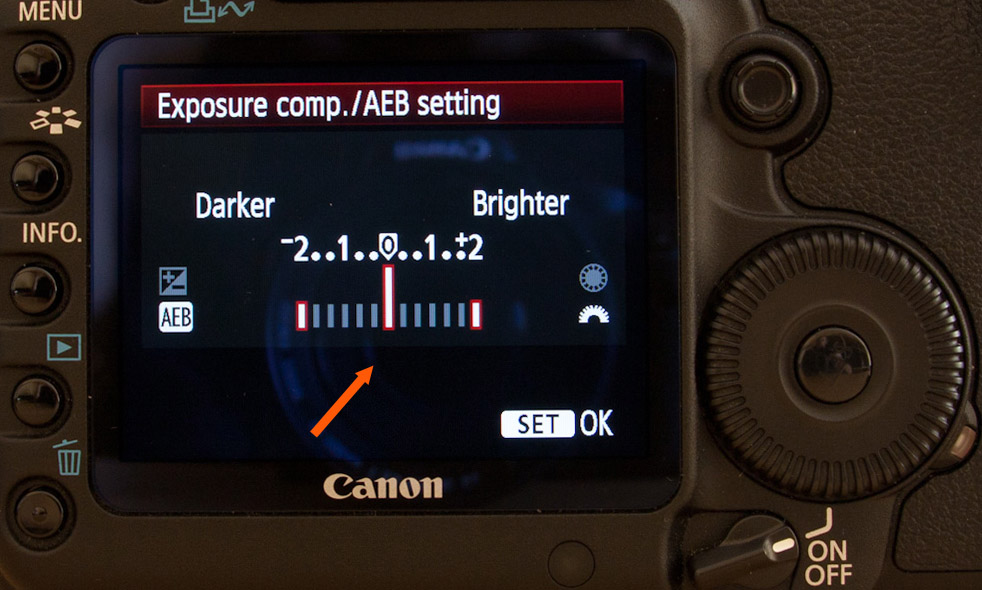
So after you set up your composition, you need to set up your camera. Turn on AEB and set it so you take shots at -2,0 and +2 EV (or -2,-1,0,+1,+2 if you have a Nikon camera). Switch your camera to AP mode (aperture priority mode) and using a self timer or a cable release take you shots. On the right is how the AEB setting looks on a 5D mark II, most cameras have a similar menu.

The ISO on your camera should be left as low as possible (100-200) if you want to avoid noise in your final HDR.    Also the aperture should be lower (F5.6 – F11) if you want to have the whole image sharp and in focus. When you set this up you should check the time, the camera shows you for the first shot (0EV). This exposure time should be 8s or below. This is so the brightest shot is still below 30s. If it shows you a longer time, choose a higher aperture or a higher ISO (or both), until you have the required exposure time.

If you need more than three shots, the simplest way is to move you middle exposure. So you can just take shots at -2,0 and +2EV and then underexpose by one stop and take shots at -3,-1 and +1 (or overexpose, based on the situation). Like this you can take quickly quite a lot of shots.

Look at your camera manual, to find out how to turn on AEB and under/over-expose a foto on your camera.

Taking the shots using a Promote Control remote

An advanced way of taking your shots from a tripod, is using the Promote Control remote. Most of the steps are the same, but to take the photos you just set up the starting time and number of shots on the remote, and it does most of the work for you. You can find out more on my Promote Control remote review page.

This is the sample bracket series I took from a tripod, with the help of the Promote. I could have had the same result, if I took three separate series at -3,-1,+1, the second at -2,0,+2 and the third one at -1,+1, +3,  it just takes longer, and you have a much bigger chance, that your photos wont align properly. If I wanted to have a bracket with a time longer than 30s, the only way to get it is by using a Promote.

Taking the shots handheld

You want to get the same result as if taking from a tripod. So you have to have the exposure times as short as possible, so the photos align better. Use burst mode on your camera, this way you can take multiple shots simply by holding the shutter button, use a higher ISO, based on you camera an ISO 400-1600 is still acceptable, use a bigger aperture and try to hold the camera still. Don’t forget, that you can correct noise, but not an out of focus, blurry photo.

A good practice is to lean on something, or to place your camera on an even surface, hold it down and take the photos using a self timer. Also try to have your slowest exposure time faster than 1/the focal length you are using. So if you use a 50mm lens, the slowest exposure should be not more than 1/50s. This is that your shots should be max 1/50s, 1/200s and 1/800s if you take your photos at +2, 0 and -2.

This is a sample series taken handheld. It’s really much simpler when there is enough light. You can see the resulting HDR from these brackets here – Toledo reflection

Taking shots without AEB

When you need more than three brackets or you just don’t have AEB, you can still do it manually. You have to

  • exposureset your camera to manual mode, set your ISO and aperture
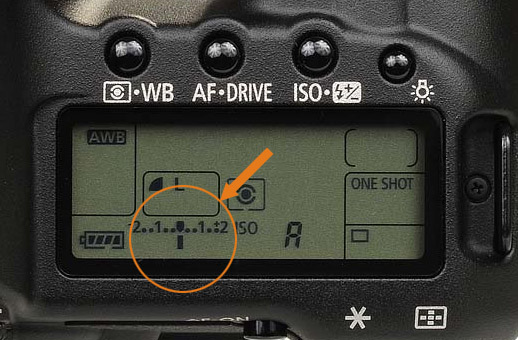
  • find the normal (0EV) exposure (half press your shutter button, so the camera meters the scene and then change the time, until the small line is under 0EV, as in the photo on the right)
  • decide what range you want to have, for each step, half the exposure time. If you 0EV is 1s and you want to start with -4EV, your starting time should be (((1s /2) /2) /2) /2 equals 1/15s  (it’s really 1/16, but you can not set it on a camera :) )
  • set up you camera for the darkest shot and take it
  • double the exposure time and take the shot, repeat this until you have all the brackets you need. Each time you double the exposure time, you move your photo by 1EV

A little tip to make this simpler :) A lot of cameras can be set up, so you change your settings in 1/3EV increments or 1/2EV increments. This is usually in custom settings. If you change this from 1/3EV to 1/2EV, you have one step lees between two exposures, so you can change your settings faster. On Canon 5D this setting is called “exposure level increments”

I really suggest doing this only from a very solid tripod, and best with a cable release, so you touch your camera as low as possible. Also you should be really fast, so if there is anything moving, or the light is changing, you have similar condition in all shots.

Don’t forget to align images taken this way, as there can be differences in between them. You should look at them the same way as at your handheld images.

Here is a video showing different ways of taking your brackets

Always shoot in RAW

This is a really important point. There are many reasons, but just to name a few:

  • you don’t have to worry about white balance, you can change it at anytime and as often you want
  • you get better results, when creating a HDR from a single photo. RAW has much more information than a JPG file.
  • even if you have overexposed areas in your darkest photo, you still can recover them if you shot in RAW
The only argument against using RAW is the space it takes on your card and HDD. But with the falling prices per megabyte, this is a very bad reason. And it’s better to be safe than sorry.


How many shots do you need?

This is a very common question. Most of the time you are fine with three shots, at -2, 0 and +2 EV. Taking more can help you to have cleaner color transitions in your photo (for instance in a sunset sky), but most people will never notice the difference. But when you definitively need more brackets, is when you shoot into the sun. Sometimes you can go as low as -4EV and it’s still not enough.

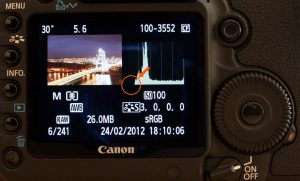
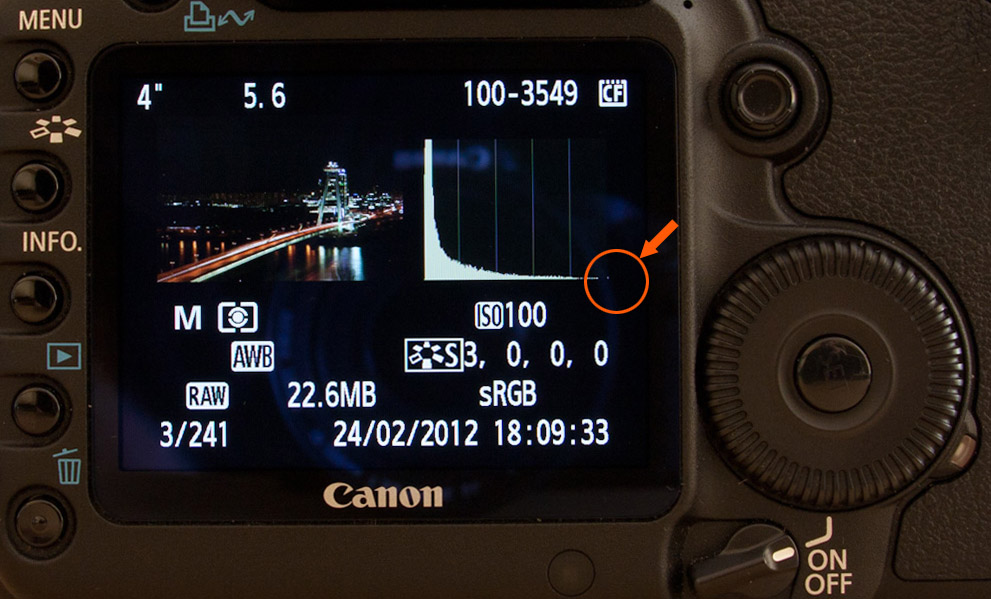
You can simply check your photos directly on your camera. The brightest photo should have no (or very little) complete black areas (histogram doesn’t touch the left side) and the darkest should have no (or very little) overexposed areas (histogram doesn’t touch the right side).

Light Bracket   Dark Bracket 

Organizing your photos

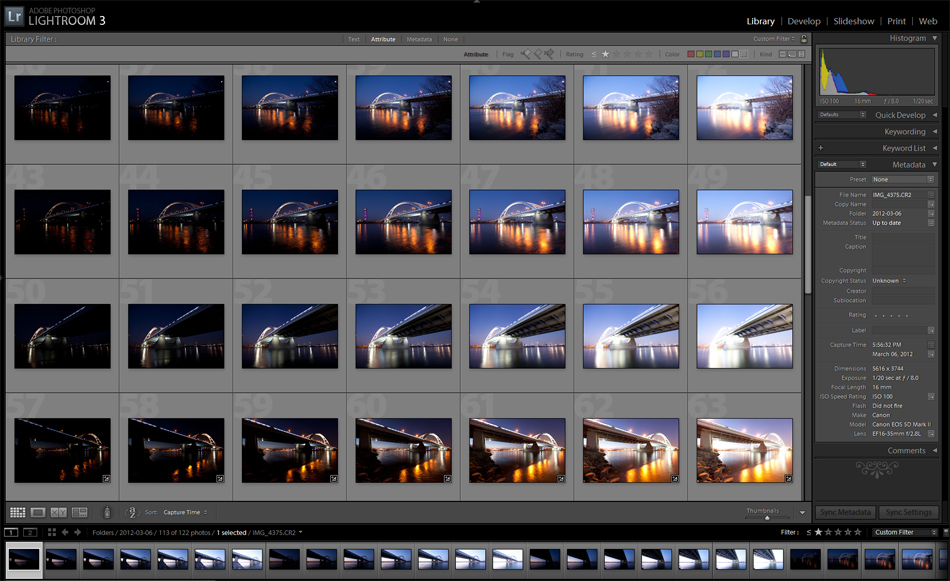
After I’m done taking my photos, I import them into Adobe Lighroom, where I make first few adjustments. I will do a separate tutorial on my organization workflow later on. But for everyone it really depends mostly on what program u use for it.

Lightroom Screenshot


This is all for the first part, the next part will be about preparing your shots in Lightroom and merging them in Photomatix.

Page 26 of 26« First ...102023242526
FREE EBOOK!!!
Subscribe to my newsletter and get a free Capturing fireworks ebook. 
Subscribe