I’m away again, in Budapest again, and should be back tomorrow. And since I planed this trip from day to day, I don’t have a photo for today. So to make up for it, how about a quick sale for today, of my video tutorial. Use the code “QUICKSALE” to get 30% off from the price. That’s around 15usd off from the normal 49usd price (So the new price is 34,30 usd). The code will be active for the next two days :)

Add to Cart

To get all the info, and sample videos on the series, please check the Master exposure blending page.

and hear you can see the introduction video, to see what it’s about

As it quite often happens, that one wants to take photos where tripods are not allowed (usually for some very stupid reason that just does not make sense :)), one always has to be prepared with some alternative to a tripod. And in this post, I’m will go through some of the available alternatives, and what to do when nothing is available.

1. Ask for a permission

You would not believe how often just asking is all you need to do. If you are in a place, where you can find a person responsible for the area, just try to ask. It never hurts. Also, if you know that you will be there in a certain time, try writing them before and asking for a permission. Not always, but really often they will reply and give you access. And don’t forget. Be nice and polite. Never get offensive. If you are nice to the people, they will usually try to be nice to you, and grant you your request.

It’s actually funny, that sometime they don’t see a reason why you are asking, as they think that using a tripod should be a normal thing. For instance it happened to me in the Westminster Cathedral in London, where the answer to my question on using a tripod was of course, why should it not be allowed. It was doubly interesting, as in the Westminster abbey not only the tripods, but not even photography was allowed :)

2. Use a clamp/gorrilapod

A great alternative to a tripod is a clap. If you get a good one (like the Manfrotto clamp), it’s even sturdier than a tripod, when attached to a good place. It you are at a place with thin railings, glass walls and similar, this is the way to go. Of course don’t attach it to everything, especially things that can be broke or damaged easily. Also in some places clamps are not allowed, mostly due to the possibility to damage something. Usually, if something does not look cheap, don’t attach the clamp :)

An alternative to a clamp is a gorrilapod. It gives a bigger versatility in what can it be attached to, It’s just not as stable as a properly attached clamp.
gear-table

3. Use a mini-tripod

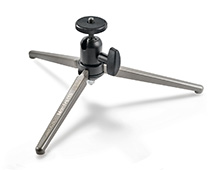
Mini or talbetop tripods are made mostly for compact and small cameras, but there are few out there, that can hold a full DSLR without problems. You can’t really use a huge lens, and the vertical shooting, without a L-bracket on the camera is not really that possible, but still, it’s much better that shooting from hand. Especially if you have those huge cement railings, where you have no problem placing one on top, or are by a small wall, which is just so high, that you cant use a tripod, this is your best choice.
The pod

4. Use a bean bag

Another alternative to a tripod, is the bean bag. This are usually very cheap, light bags, that you can even have permanently attached to your camera. I don’t think anyone will ever stop you for using one of those, and compared to a mini tripod or the clamp, there is almost no chance that you will be able to damage something with one. They are not as stable, but for shorter exposures (1-2 seconds) they are enough. Just don’t point the camera up, as the bag will sag, and don’t forget to use a timer, so you don’t touch the camera.

5. Do the shots handheld

When everything else fails, go for handheld shots. And to have a better chance to get a nice shot while doing that, here are few tips.

Hold you camera close

Hold you camera as close as you can. Brace your arms to your body. Like this, you get much less shaking in them and so you will be able to hold longer exposures. Never take the photos with your arms stretched in front of you.

Use Auto-ISO

If you use Auto-Bracketing to get brackets for HDR, turn on Auto-ISO. What it does, it, that with the brighter exposures, instead of using longer time, the camera with use a higher ISO. Like this you can avoid a lot of the movement in the final shot.

Use fewer brackets (or only one)

Take fewer brackets, by using higher differences between shots. If you can take 5 shots with 1EV difference or 3 shots with 2EV difference, go for the second option. Less brackets are much easier to align. If the dynamic range is not that big, think about just using a single shot and just getting the information you need from the single RAW.

Go wide

You maybe heard of a rule, that when taking photos handheld, the exposure time should be at lease 1/focal length of a second. So for instance on a 35mm focal length, you should have an exposure time faster than 1/35 of a second. This is not completely exact, as everyone is different and can hold the camera better or worse, but it’s a good starting point. So when taking handheld, if you use wide angle lenses, or just zoom out as much as you can, you have a much better chance to get a good result.

Use higher ISO/bigger aperture

By using a higher ISO, you will get more noise, but that’s something you can correct. A bury photo can never be corrected. Same with bigger aperture, you will get a smaller DOF, but if you understand how DOF works, and especially if you go with a wide angle lens, it still should be enough for most situations.

Take the shot more than once

When shooting handheld, always take every photo more than once (if possible). Even with the best light, you will have some of the shots blurry. Just having multiple shot, gives you much better odds, that one of them will be usable.

And if nothing works, be ready to take the shots very quickly, and than be thrown out. But I don’t really suggest that :).

To end this post, here you have two photos, both from the Frauenkirche in Dresden, one taken from the top while using the bean bag, the second one inside, taken handheld.

Dresden
Frauenkirche

And another Monday is upon us and that means another process post. For today I chosen a manually blended photo taken in Edinburg, Scotland. So let’s take a look at it.

Here you have the final photo and the original 0EV RAW file.

Early morning in Edinburgh

 
So what I needed to correct was that few areas were to bright, few were too dark and the whole image was too cold. So I started as always, by loading the 5 exposures into Lightroom. There are corrected the lens distortion, chromatic abberations and a little noise. Then I exported all the files into Photoshop layers.
Early morning in Edinburgh
 
I then did the following edits (layers numbered from bottom up):
1. -1EV exposure as the base for edits. I had better overall exposure for the sky so that’s why I chosen it as the start.
2. -2EV exposure to darken the pillars and the middle area of the sky.
3. 0EV to brighten the street and the pillars
4. +1EV to brighten the shadow areas
5. +2EV to brighten a small dark part in the photo.
6. Added contrast to the basic mid-tones
7. Added more detail using a high-pass filter
8+9. Added glow to the photo
10. Brightened the dark areas even more (I explained this step in a video I posted few days ago)
11. I wanted the pillars to have a more golden color, so using a soft light layer, I sampled a color from the back pillars and painted it onto them.
12. Changed the hue of the blue color a little toward purple.
13. Color efex pro contrast to get more local contrast and detail. I removed the effect from the sky and the highlight on the pillars.

Early morning in Edinburgh
 
And that’s all I did with this image. To find out more on how I edit, check out the guides and before after categories on this blog, or check out my video tutorial series here:
banner-master

I was thinking what to include in the blog post today, and in the end I thought that I will create a small video tutorial, for something I do very often in my editing. So here it is. In this video, I will show you have I use luminance selection and curves, to brighten and darken parts of the photo, without loosing the overall contrast.

You can also download the PSD of the final file that you can see in the video from Dropbox here.

If you have any questions, feel free to ask, and don’t forget to switch the video to 720p :)

For more videos from me, check out my Video tutorial series Master exposure blending here:
banner-master

With the cameras getting better and better, and also the focusing systems getting better, I still think manual focusing is still the way to go. And in this post, I will try to show you why, and also how to do it, so you get the best results all the time.

Why focus manually?

Glowing tower

The reasons are divers, so let’s take a look at them.

1. Your camera can’t read your mind

The autofocus can be as good as it gets, but it can never really know what you try to take a photo off. You can help it by choosing your focus point, or use a single one all the time, but still, it will never be 100% accurate with focusing on what you want.

2. Your camera can’t see in the dark

Ok, neither can you, but you really don’t have to. When focusing in dark spaces or late at night, you need just a small area with a little light in it, to be able to focus onto. A single street lamp in the distance is mostly enough to get a sharp photo.

3. Your camera can’t focus on very small objects

Each camera has only a certain number of focus points. If you taking a wast landscape, or a your scene is mostly dark, and there are only few light sources, it’s hard to tell the camera to focus exactly on one of them. Or for instance you shooting a night sky, and want to get a good focus on the stars (I found out that just focusing on infinity, never really worked for me). With manual focusing, you can just choose a bright star and focus onto that.

4. To maximize the DOF (Depth of field)

If you wan’t or need to use a bigger aperture, using manual focusing can really help you adjust your DOF. You can really select the subject and have no fear that it will be out of focus.
Photo & Video Sharing by SmugMug

5. To keep the same focus

This is especially if you shot HDR, time-lapse, or have a different reason to need multiple shots to be combined. If you use manual focus, you will never have to fear, that your camera will focus on something different in the middle of a sequence.

6. You want to do focus stacking

Focus stacking is a way, where you take photos with different focus, to get a bigger DOF from a combination of them. This is just such a pain to do with autofocusing. Especially if you just need two shots, one for background and one for the foreground. With manual focusing, you can do this very quickly, just by turning the focus wheel :)

When not to focus manually?

Of course there are situations, when manual focusing it not the way to go. Mostly this is when you try to get a moving subject. It’s really hard to focus manually then. Still, with a lot of practice, one can do also that. If you can estimate the DOF, so you subject is completely in focus, you can focus manually and take all the further shots without refocusing. If you taking photos of something that is really fast changing (for instance fireworks), not having to refocus, will get you many more photos.

How to focus manually?

So now you know why you should be focus, now let’s looks how to do it.

1. Switch your lens to manual focus

This one is really important. First of all, you don’t want to damage your lens. The better (pricier) lenses can be focused manually even with the auto-focus on, but on some this would damage your focusing motor. Also you don’t want the autofocus to change your hard work.

2. Use live view

It’s really hard to use manual focusing without a live view. You can of course do it through the viewfinder, but you will never be so accurate. What you need to do is go into live view and zoom into the exact area you want to focus onto. Most cameras allow for a 10 times zoom, which grants you the ability to focus very accurately. Just be gentle when using longer lenses, as every touch will make it shake, so making the focusing harder.

Live view
Normal live view
Live view
10x zoom

3. Focus 1/3rd into the scene

This is a basic rule of DOF. If you focus on something, than 1/3rd of DOF will be in front of it, 2/3rd’s behind it. Witch this in mind, of course one needs to focus 1/3rd into the scene. You don’t have to be really exact, as long as you are not going for a very shallow DOF. With a little practice and experimenting, finding the 1/3rd spot is a madder of seconds for every scene.

Light sources

4. Focus on light sources

This is mostly for late night scenes and night sky. You just need a single light source to be able to focus. You can even create your own using a flashlight. Just find the light source on your screen and focus onto it. Than try to refocus, while looking at the shape of the light source. The smaller it is, the sharper your shot will be. To say it differently, if you see a bokeh, you are not focused correctly.

To the right you have an example of a scene, where your camera would have a very hard time to fins something to focus on, but manually it’s done in seconded.

5. Remember the basic rules of DOF

To make this easier for you, always remember the basic rules of DOF. The smaller aperture, the further away the subject and the wider the lens, the bigger DOF you will get. So especially with landscape shots, if you are using a wide angle lens, once you focus on anything just few meters away, you will get everything in focus. You don’t need to know the exact DOF for every setup, but knowing if you should expect a shallow or a deep DOF is always good.

6. Practice manual focusing

On every camera, there is a certain order of steps (button presses) to get into manual focus. With a little practice one can do those without even needing to look at the camera at all. For instance on my 5D mark II I can do this by pressing the live view, using the joystick to move the zoom square and then press zoom until I get to 10x magnification. If you doing multiple shots after each other, you don’t even need to leave the live view between shots.

Using a DOF calculator to help you focus

One way to be more exact with the focusing, is using a DOF calculator. There can be found many of them for every mobile platform. A DOF calculator, is a piece of software, that based on the focal length, aperture and focus distance, can tell you exactly, how much DOF you will get. You can use it easily, to determine the focusing distance, if your goal is a specific DOF.

DOF Calculator
DOF Calculator on Android
DOF Calculator
DOF Calculator Pro on Windows phone

I don’t think it’s that useful in the field, as it take too much time, but it’s a great tool to look at, to get better familiarized with one’s own lenses. Just enter the values, and then just change the focusing distance, to see how the DOF changes.

That’s all on Manual focusing, but feel free to ask if you have any questions.

FREE EBOOK!!!
Subscribe to my newsletter and get a free Capturing fireworks ebook. 
Subscribe