Tomorrow I will be back home from Prague, but until then, I got for you another process post for today. This time it’s a photo from a rainy day in Paris. So to get to this final result:
Returning to La defense

I did the following (layers numbered from bottom up)
1. 0EV exposure used as base
2+3. -1EV and -2EV exposure to darken the middle area
4. +1EV exposure to brighten the buildings
5. -1EV exposure once more, just for the sky (I didn’t like the result of blending)
6. retouched out the crane in the corner
7. used the +2EV to brighten few more dark spots
8+9. blurred layer and curves that brighten it to add glow to the photo
10. exposure to brighten the dark areas further
12. added a little saturation
13. pushed the color balance more towards green

LaDefense-process

Continue to the full post to see the original 0EV photo

And another process for a shot for you. This time it’s a blue hour photo from Prague. So to get to this result:
Passing ship

I did the following steps in Photoshop (numbered from bottom up)
1. 0EV exposure used as base
2+3. -1EV and -2EV exposures used to darken the lights and castle
4+5. +1ev and +2EV exposures used to brighten the foreground and to merge the lights from the passing ship
6. added detail using a high-pass layer
7. added contrast to the basic mid-tones
8. used Color Efex Pro contrast to give more local contrast to the image
9. used Color Efex Detail extractor to add more details to the buildings
10+11. blurred layer used to add glow to the image
12. brightened the dark areas of the photo
13. darkened the mid-tones using levels a little, to recover contrast

Prague-process

Continue to the full post to see the original 0EV image.

Today another process post. These look to be quite popular, so I’m thinking of making Monday the process post day. What do you think? :)

Today it’s another shot from London. This was created using manual blending in photoshop and I used Color efex pro and Tony Keuper actions here.

So to get to this image:
Blue lit stairs

I did the following. First I corrected the white balance in Lightroom and also toned down the highlights on the darkest exposure. Then I loaded all the files in Photoshop and continued as follows (layers numbered from bottom up):

1. 0EV exposure
2+3. +1EV exposure darkened by one stop and used to remove people from the stairs
4+5. +2EV exposure darkened by two stops and used to remove people standing by the railing
6+7. -1EV and -2EV exposures used to darken the lights
8. +1EV once again to brighten the dark areas
9. on this layer I retouched out the crane in the background
10. added contrast to the basic mid-tones
11. Color effex pro contrast to give more pop to the image
12+13. added glow using a blurred layer and brightened it using curves
14. added more saturation to the sky
15. TK actions vibrance mask to add more saturation to some parts of the image
16. brightened the image by changing the exposure
Bluelitstairs-process

Continue to the full post to see the original RAW image.

Today I have for you another photo process post. This photo of the Bojnice castle is one of the most popular photos I ever posted, so I think the way I edited it would be interesting to you. So to get to this final image:
Bojnice Castle
I used luminance mask to combine the shots. To be exact I did the following steps (layers numbered from bottom up)
1. original 0EV exposure
2-3. -1EV and -2EV exposure to darken the sky and other bright spots
4-5. +1EV and +2EV exposure to brighten the foreground
6. -1EV exposure once more to recovel some lost contrast from the blending
7. added contrast to basic midtones
8. added detail using high pass layer
9. darkened and added contrast to the brighterst parts of the image
10. added more local contrast using the Color efex Tonal contrst preset
11. added more contrst using the Color Efex Pro contrast preset
12. removed noise in the foreground elements
13-14. added glow using a blured layer
15. additional brightening for dark areas
Bojnice-IMG_3091-process
To see the original 0EV exposure, please continue to the full post

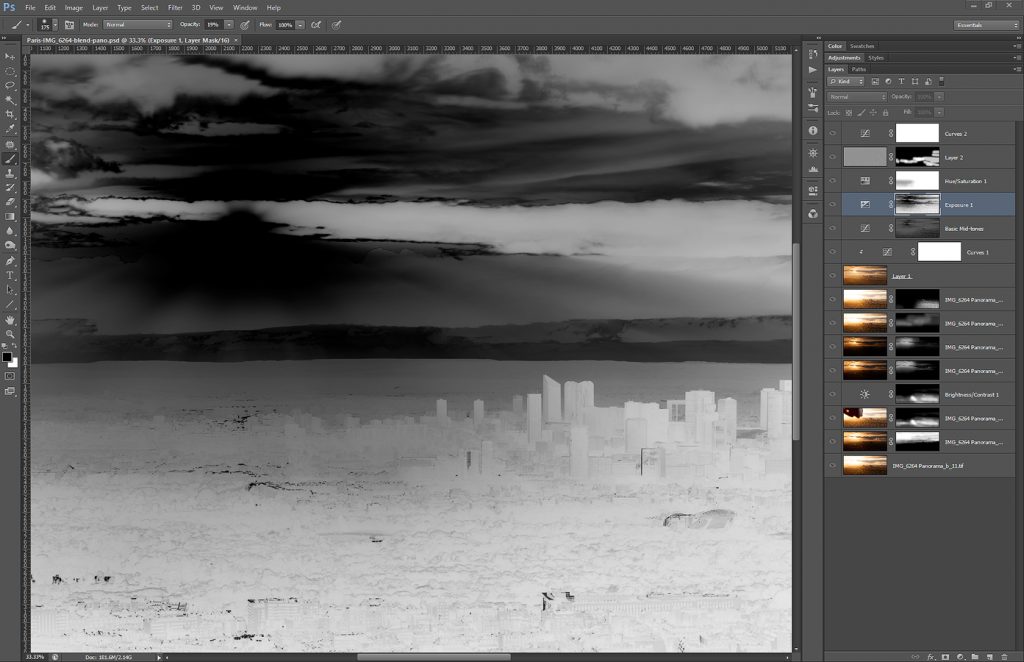
Today I have for you another photo process post. Today it’s a nice panorama from Paris
The Epic sunset
The luminescence masks can looks quite interesting sometimes. So I inluded a Photoshop screenshot of a luminance mask, that also shows what editing steps I made after combining the shots into panorama (you can see how I combine shots here: https://www.hdrshooter.com/guides/combining-photos-for-hdr-panoramas/). As you can see, I used only few layers and no plugins. All done in Photoshop. Recently I tend to go the route of fewer modifications as possible

But to the screenshots. The layers are (from bottom up):
1: 0EV exposure as start
2: -2EV exposure for the sky
3 and 4: 0EV exposure from a second series where I held my hand in front of the sun, so I get no flares and I can blend that photo with the normal one + brightness modification for that layer
5 to 8: other exposures, to darken the sun and brighten the foreground, mostly manually painted masks
9 and 10: glow layer
11: added contrast to basic mid-tones
12: little bit of exposure to the dark’s
13: little bit of added saturation
14: high pass layer for more detail in the shot
15: a little bit of overall contrast

Not much sharpening here, as I do that after I re-size the photo.
Screenshot
Continue to the full post to see the original photos I used.

Page 18 of 24« First ...1017181920... Last »
FREE EBOOK!!!
Subscribe to my newsletter and get a free Capturing fireworks ebook. 
Subscribe