Free HDR video tutorial

Free HDR video tutorial

MASTER EXPOSURE BLENDING

Find the best ones

Find the best ones

TOP PHOTOGRAPHY SPOTS

Free wallpapers

Free wallpapers

HIGH-RESOLUTION WALLPAPERS

One of the accessories, I felt the need for last year, was also a way to shade the camera while shooting through a window. Doing this with just a jacket or something similar is just not effective enough and is just cumbersome. So in the end I went ahead and ordered a LENSKIRT. For what it is, its not the cheapest accessory (49usd right now) but if it helps, thats secondary.

I have tested a new version of the LENSKIRT, which corrects the quality problems I mentioned here. You can find the update here.

What’s a LENSKIRT

LENSKIRT is a cover you attach to a window using suction cups. Once that is done, you put the camera from the back into it, and tighten the drawstring to seal the back of the LENSKIRT. Like this, you completely cover the camera, and prevent any light from creating reflections on the glass.

LENSKIRT - review
LENSKIRT - review

In the package you get a LENSKIRT and a short flier with few tips on how to use it.

Build & Quality

The quality is a bit of a disappointment. The front part is from a solid material, but the back cloth feels really flimsy and cheap. It’s even partially translucent, as you can see on the previous photo. The way the LENSKIRT is sewn together looks like someone was in a hurry, and didn’t care that much. On my piece, one corner is not properly aligned and the inside of the thick front material is visible. Also the way the big pieces are sewn together looks ugly and very amateurish (as you can see from the included photo). If the price was 10 dolars, I would say I got what I payed for, but with the higher price, I was expecting much more.

LENSKIRT - review
LENSKIRT - review

The suction cups are nice and each one has a small nob on it, to make the detaching easier.

Does it work?

I had no issues attaching the LENSKIRT to glass. It takes a bit of experimenting to find a good order in which to attach the suction cups, but it does work. Also putting the camera inside is easy.

LENSKIRT works really nicely in removing the light reflections once used. Here is an example for you. Same settings, same position of the camera, same lighting inside the room. The first shot is without the LENSKIRT, the second is with the LENSKIRT.

LENSKIRT - review
LENSKIRT - review

As you can see, I got rid of all the reflections. But to show you better the inside, here is a photo with the camera zoomed out and pulled a bit back. There is a bit of a light leak around the sides, but you would not see that wide anyway, as you would see the suction cups in the shot. To get best results, the camera lens should be much closer to the glass.

Conclusion

The LENSKIRT works great on what it should do. But the quality is not representative of the price it costs. If you know you will be shooting through the glass a lot, you should get it. If no, that you don’t need one.

I have tested a new version of the LENSKIRT, which corrects the quality problems I mentioned here. You can find the update here.

For a while now I needed to replace my 10 stop ND filter. I used a Hoya 400 filter until now, but due to a small accident some time ago, when it got loose from the lens, and hit a dirt road, there were many small marks on it. It just got too tiresome to clean everything on every single photo.

This time, I wanted to go with a filter system, to allow for better flexibility and application. I started searching around, and in the end, I chosen the Formatt-Hitech filters, the Travel Filter Kit, Elia Locardi Signature Edition, Firecrest series (details on the official site here). Elia is a great photographer and a friend and I trust that he would only give his name to a quality product.

Formatt-Hitech Filters

Whats in the kit?

So this is not just a single filter, but a whole kit. where you get everything you need to start with. The Travel filter kit consists of:

  • an aluminum filter holder for the filter size one chooses + a spacer for 4mm thick filters
  • one lens adapter in the size you choose (I chosen the 82m for the 16-35 lens)
  • ND 3.0 square filter – this is a 10 stop ND filter
  • ND 1.2 square filter – this is a 4 stop ND filter
  • ND 0.9 soft grad filter – this is a 3 stop soft graduation filter
  • filter pouch for three filters
  • gaskets for the square filters
  • replacement and shorter screws for the filter holder
  • booklet with Elias photos and tips about using the filters
Formatt-Hitech Filters

I chosen the 100mm filters with a 82mm adapter, that I needed for the Canon 16-35mm f2.8. There are two types of filters available from Formatt-Hitech. There are Firecrest, which are made of glass, and ProStop filters, which are made from resin. I could not really find any significant difference mentioned between these to, and I chosen Firecrest for myself, as the price by the seller I ordered the kit was only very slightly bigger than the resin ones.

I also got a second adapter ring, the 77mm one, for all my other lenses. Formatt-Hitech provides two tipes of adapter rings. There are standard and wide angle adapters rings. To show the difference, here is a small diagram of the cross section.

To explain this, the wide angle places the ring behind the front element of the lens, while the standard places it in front of the lens. So for very wide lenses, the standard one would cause vignetting. They ship the wide angle ones with the 100mm holder, but I mistakenly ordered a standard one for the 77mm adapter. Still, that would probably be not problem, as those lenses are not as wide.

Formatt-Hitech Filters

From the content of the kit, I’m missing only two things. One is a pouch for the filter holder or a rubber ends for the screws of the filter holder. The screw ends are quite sharp and I fear that just having it as it is in a camera bag, could end in damaging the bag or some other camera equipment. Secondly, some short introduction to the holder would be nice. This is my first system of this type and even though I did quite a lot of research beforehand, I still had questions. For instance, a mention about the gaskets (square sticker applied to the filter to create a better with with the holder) would be great somewhere. I seen other unboxings, where the photographers had no idea what they were. Even on the official site it took me quite a while to find a mention of them. Or if I should remove the 4mm spacer when only having 2mm filters, as putting a filter right next to the holder without the spacer, makes a very ugly sound, and I feared I cold damage the filter (I solved this by leaving the spacer and applying the gasket. Like this it fits very nicely).

This is not really a big problem, but one that could be solved very easily.

The build quality is very nice. The main part of the holder is made from aluminum with the holders from a sturdy plastic. I expect a lot of scratches to appear rather quickly, as for instance the adapter ring shows signs where the holder was attached almost immediately, but thats from the nature of the material.

Putting the adapter on the lens is easy as screwing on a normal filter and once you tighten the screws on the holder the filters hold nicely in place.

Formatt-Hitech Filters

I had only a little time to try out the filters in the field, so don’t take this as a review. But here are some of the first test shots. The first one on the left, is taken without any filter at 1/8th of a second. The white balance is set based on the snow on the right. The second one, is taken through the 10 stop ND filter (ND 3.0), at 131 seconds. The white balance is exactly the same as the first one had. So here you can see this green tint this filter introduced to the photo.

The last one, is the same 131second shot, but with the tint and white balance changed to compensated for the ND filter in Lightroom. As you can see, the green shift was quite easy to remove.

I will have to take many more photos through these filters to get a better feel for them, but for now, they look promising. So expect a bigger review, with many more example photos in a month or two :) And if you want to know more about long exposure photography, check out this article.

Last time to submit your photo is today (7th) at midnight GMT.

Contest sponsored by Aurora HDR from Macphun & Trey Ratcliff

Thanks to Macphun & Trey Ratcliff I have for you another round of my editing contest. And to make this one bigger and better, you have even more days to submit your entry this time, plus there are great prizes for you.

Aurora HDR is the newest HDR software available, just named by Apple as one of the Best Apps of 2015. Aurora HDR is very powerful, works as a standalone or as a plug-in and gives you start-to-finish editing tools.

For those who are not familiar with Macphun and Aurora HDR, Macphun are the creators of many great photo editing applications and plug-ins. Aurora HDR is their newest creation built in collaboration with Trey Ratcliff, one of the most popular HDR shooters around.

For more information on Aurorar HDR Pro, you can check out the official Aurora HDR website, and my Aurora HDR review, that I posted some time ago.

You can also download a trial version of Aurora HDR and try it out right away. The download is available from the Aurora HDR website here. Currently, only a MacOS version is available.

Download trial version Aurora HDR
Visit MacPhun

When you are done playing with it, here is how you can enter the contest. For those who have joined one of my other contests in the past, the rules are the same!

How to join the contest

1. read the complete rules first :)
2. download the provided series of brackets showing a view of the blue hour Dubai Marina in Dubai, here from Dropbox
3. edit them into a final HDR photo (you can use any software and any technique, tone-mapping, blending, exposure fusion, black&white version, use the Aurora HDR trial, etc…)
4. join the contest event on Facebook here and post your photo into the event or send the final edit to me, under miroslav.petrasko@hdrshooter.com with the subject “HDRshooter contest” (please don’t post the full size version, 1500px wide is enough)

Only one entry per person is permitted. Please don’t use parts of any other than the provided photos. If you post your photo to the event page and want to change it later, you can delete your submission and upload a new one. If there is more than one from a person, the last one is entered and all others will be deleted.

Winners & Prizes

Jury selection winner will be selected by a jury of great photographers:

The jury selection prize is an Everyday Messenger bag by Peak design. A premium day-to-day essential carry workhorse, The Everyday Messenger is for photographers, travelers, commuters and everyone in-between. I also use this bag, and you can read my impressions of it here.

Everyday Messenger bag
Parrot Jumping Sumo Drone

People’s choice winner will be selected by fans on HDRshooter Facebook page, where everyone can vote for their favorites (once all the entries have been submitted). This voting will be in a newly created album, not in the contest event. Sharing of your entries further to promote them is permitted, but entries with fake likes will be disqualified.

This winner will receive a Parrot Jumping Sumo Drone by ParrotThis is a very cool, remote controlled, two wheeled, jumping drone by Parrot. Just check out the official videos, and you will see how much fun you can have with one :)

How long do you have to submit your entry?

The latest time to submit your entry is  7th February 2016 at midnight GMT. The voting on the winner will be held during the week from 8th to 14th February 2016 on the HDRshooter facebook page. The winners will be announced during the week starting with the Monday 15th .

I hope you will all have fun editing and good luck to you all :)

I reserve the right to change or amend the competition rules at any time without prior notice. By entering the competition, entrants agree to be bound by these rules. All participants can’t use the original or final photograph for any commercial use and have to give credit to me as the original author, also I will not use their versions for any purposes other than promotion of this competition. Participants can share the photo on their Facebook, blog, flickr or other accounts, but still have to give me credit as the author and link back to the contest.

In this second part, we will look together at what camera modes are available, and which one to use when. Before you start reading, please be sure you understand how exposure works, and what are Aperture, Shutter speed and ISO (all covered in the first part).

There are six basic camera modes that I will cover here, and when to use them. These modes are :

  • Automatic (mostly a green square or AUTO) – the camera chooses everything for you
  • Program (P) – the camera chooses the aperture and shutter speed for you, you can select the ISO
  • Aperture priority (A or Av) – the camera chooses the shutter speed for you, you can select the Aperture and ISO
  • Shutter priority (S or  Tv) – the camera chooses the Aperture for you, you can select the Shutter speed and ISO
  • Manual mode (M) – you have to set up everything, nothing is automatic
  • Bulb mode (B) – is a special manual mode for long exposure photos

Please note that most cameras offer a setting for Auto-ISO. When set, the camera will choose the ISO for you, regardless of the mode selected.

Automatic

A mode best used for snapshots. You just want to take a picture, and you don’t really care how it will look. In automatic, most cameras are set up to use a bigger aperture and higher iso, just to be sure you get a short enough shutter speed, so the photo is not blurry. So if you are not in a really well lit space, or outside during a sunny day, this can easily result in out of focus, very noisy images. If you are at least a bit serious about photography, you should move away from this mode rather quickly.

Program (P)

Program mode is a bit similar to Automatic, but it already gives you access to some settings. Better said, its everything except aperture and shutter speed (there are more settings available then the basic one, like white balance, focus points and similar, but here I will just stick to the basic ones, all others will have their own articles).

Program mode is a good point to start. As you can change the ISO, you can already influence the photo in quite a strong way. You can also observe what settings the camera chooses for you, and since you already understand what they do, you can easily then move on to more advanced modes.

Aperture priority (A)

Probably the most useful mode. You choose the ISO and the aperture and the camera will choose the time for you. Like this, you have direct control about the DOF (depth of field) of your photos, and an indirect control of the shutter speed. You just:

  • choose a big aperture (1.2 – 2.8) when you are going for a small DOF and you want to blur out the background
  • choose a medium aperture (5.6-8) for normal photos, where you want sharp detail, but not need that much of a DOF
  • choose a small aperture (11-22) when shooting wide view, like architecture or landscapes, in situations where you really want to maximize your DOF.

Aperture priority works wonderfully in a combination with Auto-ISO. If you shoot hand-held, you can set  the aperture to an acceptable value for the DOF you need, and the camera will try to increase the ISO so you get short enough times for a hand-held shot.

Shutter priority (S)

Shutter priority is the opposite to Aperture priority. You choose the ISO and the shutter speed, and the aperture is chosen by the camera. This is mostly meant to be used when you really need to have a specif shutter speed. You want to freez motion, you choose a short one, you want to blur movement you choose a long one.

While this all works as it should, I never once used this mode. As it take away control of the aperture, it takes away control of DOF. And having the DOF you want, is really important. So usually, it’s just bettor to go to full Manual mode, where you have the control of both, the aperture and the shutter speed.

Manual mode (M)

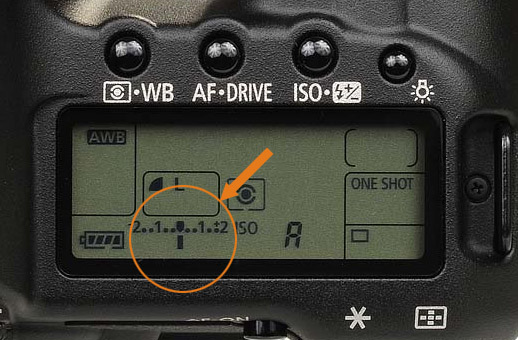
exposureManual mode is the most advanced. It gives you control of everything. You can choose your ISO, shutter speed and aperture. The camera will change nothing for you. But it will still meter the proper exposure of the scene, and indicate this on the screen. You will see an exposure scale, usually from -3 to +3 with a dot marking what exposure will the current settings result in. If you don’t see it, you have to first hall press the shutter and the indicator will show up.

Manual mode is great, if you have time to set up your camera (landscape photos) or you are shooting a series in which you know you want the exact same settings in each photo (shooting at a party, with the light being constant, you can just set up the camera once, and just leave it).

Manual mode is not preferable when you are encountering quick variations in available light.  Since you would need to tweak your settings all the time, the Apperture priority is much better for this.

Bulb mode (B)

Bulb mode is a special version of the manual mode. On some cameras its available as a separate mode, on some it’s activated when you try to change the shutter speed to a time longer than 30 seconds. In bub mode, you choose you ISO, your aperture and the shutter speed is determined by how long you hold the shutter button down. So when you press it down, the camera opens the shutter, and when you let go, it closes it.

This mode it used for long exposure photography, when you need times longer than 30 seconds. With the bulb mode, you can go as long as you want. It’s best to use this together with a remote, and most camera remotes can lock the shutter button, so you don’t have to hold it down all the time. Most cameras show a timer on the screen during this.

Scene modes

A lot of camera offer also scene modes. This modes are meant for specific situations and each mode is also represented by an icon, fro what situation it is. So there are modes like portrait, landscape, night and similar. They are in really just specific settings applied to the camera that you can do in other modes with much more control. For instance:

  • portrait mode – is usually just aperture priority, with a bigger aperture selected
  • landscape – again, aperture priority, with smaller aperture selected
  • nigh – aperture priority, with bigger aperture and higher iso selected

And so on. Once you understand what effect different aperture, shutter speed and ISO have, you will never ever need one of these modes again.

Which mode to use?

If you are just a beginner, I suggest skiping the Automatic mode completely. Start with the Program mode, play with the ISO and see what settings the camera uses. As soon as you can, move over to Aperture priority and star controlling the depth of field in your photos. And in special occasions when you need it (bracketing, long exposure, repeating photos ans similar) or when you already feel the need for complete control go into full Manual mode.

This was the closest I could get under the new Old bridge while taking photos of it on Sunday. I got right at the fence, and thankfully, my tripod was high enough to have the camera over it :)

This is a three shot HDR, created in Oloneo Photoengine, finished in Photoshop. I actually used two different ISO settings here. As I set the middle exposure to 30s, as I wanted a smaller aperture for the DOF, I had to bump the ISO to 400 for the +1EV.

Under construction
Technique: Oloneo Photoengine, Number of exposures: 3, Camera Model: Sony a7R + Metabones MkIII Adapter, Lens: Canon 16-35mm F2.8, Focal length: 21mm, Aperture: 7.1, Middle exposure time: 30s, ISO: 200 & 400, Tripod used: yes, Location: 48.139597, 17.117554
FREE EBOOK!!!
Subscribe to my newsletter and get a free Capturing fireworks ebook. 
Subscribe