Free HDR video tutorial

Free HDR video tutorial

MASTER EXPOSURE BLENDING

Find the best ones

Find the best ones

TOP PHOTOGRAPHY SPOTS

Free wallpapers

Free wallpapers

HIGH-RESOLUTION WALLPAPERS

sling-3

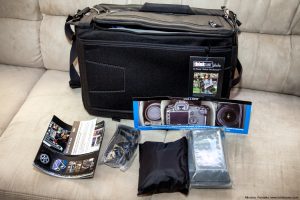
Think Tank Sling-o-matic review

I added a review of the bag I’m currently using quite some time ago, but I updated it recently, so if you missed it, you can find it as all my other reviews on the Reviews page, or you can directly view it here.

Evening at the Arc de Triomphe

This is one of those color combinations I hate. Yellow lights shining on a yellow building. I think I spend more time with tweaking the yellow color, than I did with blending and editing this photo. And I still don’t like it. Could be that I just don’t know how I would like it to be.

This is a manual blend from 5 exposures, created in Photoshop.
Evening at the Arc de Triomphe

Practice panorama

As I said yesterday, I was curious about how a gigapixel pano would look like. So just for fun (and practice), I tried to take one from the balcony of my apartment. I almost got it. The result was around 800Mpix. Funny how quickly one learns about file format limits when one tries to save something like this. jpg can’t be over 30 000 pixels wide (ok, it can, but Photoshop will not open it), tif can’t be over 2gb in file size and so on :)

Bigpano

Missing snow

Yesterday I went out again to shoot, as the snow was falling. And that was exactly what I wanted, a photo with the castle with falling snow. But for the second time this week, as I got to the location I wanted, the snowing stopped. So I ended up with few blue hour shots, and will have to try again next time.

This is a 5 exposure HDR created in Oloneo Photoengine and finished in Photoshop.
Missing snow

For today I edited one of the biggest photos I ever took. It’s from last year, but it quite fits, as there is also some snow now in Bratislava. As you can see, the color changes from left to right. This is due to how the blue hour changed into night as I was taking the photos. At first I though I would correct for that, but once I combined the shots, I liked the result more like this.

This photo was created from 10 photos, each one from 5 exposures (so 50 photos in total). The resulting photo is 26000×5600 pixels big, so around 145Mpix. I would probably continued to edit it a little further, but my PC was a little overwhelmed with the amount of data. Even the saved file from Photoshop is over 6gb :)
Light changing above Bratislava

As this is a little wide view, here is a little zoomed version
Light changing above Bratislava

And one that is 100% zoomed in.

PhotoME

Did you ever had the need to change the meta data info off an image? I had. Especially when I create panoramas from multiple exposures and somehow one of the images gets a wrong exposure time (e.g. 15 seconds instead of 16 second) and the panorama program refuses to recognize the series as HDR because of that.

I searched for a program to correct this problem, and I found this one. PhotoME. It’s small, easy to use, and best of all it’s free. So if you have such need, to edit this info in your photos, give it a try.

You can download it from their page: www.photome.de

33 minutes

That’s exactly how much time you see in this photo. As I mentioned by my other star trails photo, I managed to get two photos that evening, and this is the second one. Fro this one I had to combine 66 thirty second shots so it took 33 minutes to take this photo. The clouds were also moving, but luckily around 10 minutes in, they sky got completely clear. Also there was a slight movement in the water, so it blurred the reflection a little.

All the 66 shots were combined using Photoshop.
33 minutes

The week again passed so quickly. I feel like it was Tuesday just yesterday. But as it is again Tuesday, as traditionally, there is a process post today. I chosen one of my recent photos, which was edited using manual blending. So here goes.

To get to this photo:
One autumn sunset

I started as always in Lighroom. Corrected a crooked horizon, removed chromatic aberrations and applied lens correction. After that I loaded all the brackets into Photoshop. I took 5 exposures, but in the end, I used only 3.

When I blend images, I like to start with the exposure with the best sky. The reason for this is, that the sky is the hardest to blend, and you can easily create patches of color that does not fit together. So I try to do as fewer edits there as possible. So my edits were (numbered from bottom up):

1. -1EV exposure, as I like the sky on it
2. 0EV to brighten the buildings and the middle part
3. +1EV to brighten the middle part even more
4. Color Efex pro contrast on the brighter parts of the image
5+6. Added glow to the photo. It boosts the colors and adds more contrast (more in my glow tutorial)
7. The shadows were still too dark, so I brightened them using curves
8. Color Efex detail extractor to get more detail in the clouds. I only painted the effect where I needed it.
9. Noise reduction on the sky
10. Added contrast to the Basic mid-tones
11. More vibrance on the sky.
12. Color Balance to remove a little bit of the red from the photo
13. Overall curves to add a little bit of contrast to the photo
14. Noise reduction on the water, as it still needed some
15. Added back a little bit of uniform noise to the same area, to prevent creation of color banding.

And that was it.
One autumn sunset - Process

And here you can see the original 0EV from the camera.
One autumn sunset - Process

FREE EBOOK!!!
Subscribe to my newsletter and get a free Capturing fireworks ebook. 
Subscribe