Free HDR video tutorial

Free HDR video tutorial

MASTER EXPOSURE BLENDING

Find the best ones

Find the best ones

TOP PHOTOGRAPHY SPOTS

Free wallpapers

Free wallpapers

HIGH-RESOLUTION WALLPAPERS

An we have another Tuesday here, and another process post. For today I have chosen an evening shot from Paris, so lets take a look at it.

Framed by pillars

For this photo, I took 6 exposures, but used only 5. I had no need for the +2EV. As always I started in Lightroom, where I corrected the white balance, horizon line a cropped the image. From there I loaded all the brackets into Photoshop and continued with the following edits (layers numbered from bottom up):

1. -2EV exposure to start with, as I usually start with the one, from which I want to use the sky
2. -3EV exposure to tone down few bright spots
3. -1EV exposure to brighten the foreground
4. 0EV exposure to brighten the foreground even more
5. +1EV exposure to brighten the trees
6. added detail using a high pass filter
7. Color Efex pro contrast, to bring more local contrast into the photo, but then toned down with opacity at 60%
8. a little bit of overall contrast using curves

And that was all.

Framed by pillars

Here you can see the original 0EV exposure, for the camera info, please visit the original blog post.

Framed by pillars

While waiting for the blue hour

I was getting bored while waiting for the blue hour, and since I had a new GoPro Hero 3+ with me and a POV mount, I thought I test it out and make a little behind the scenes video.

I just think I sound strange. Not sure if it’s because GoPro, the cold (I was shaking :)), that I’m a little sick, or because everybody finds it strange to listen to own voice. But I still hope you can understand me. Btw. sorry for the quality and framing. This is my first video with the GoPro, and I don’t yet have a grasp on what everything is in the view.

Low Danube under the Apollo bridge

And this is one of the photos I took today, around 30 minutes after the video. The blue hour was not completely blue, but still quite interesting. As the Danube is also quite low now, I could get much closer to the bridge as usually, and so get a much better view. Of course I almost feel on the rocks many times, but that’s always the risk. At least they were only covered by mud and not frozen :)

This is a HDR from 6 shots created in Oloneo Photoengine and then blended with original exposures in Photoshop.
Low Danube under the Apollo bridge

Topaz-Adjust-02

Topaz Adjust 5 Review

Another addition to the review section, and another post-processing plugin. This time it’s the Topaz Adjust 5. Please continue to the Topaz Adjust 5 review page for more info about it. Or you could visit the Reviews page, to see all that are available.

Locked in the morning

Somehow recently I look more for frames in my composition. It’s just something different, as not many people use this type of composition that much, and the results are quite unique and new views of classic spots. So I did the same here, where I took a photo of the Triple bridge through the railing (and the love locks) of the Butcher’s bridge. And as I took this around 5am, I had the whole city center just for myself :)

This is a HDR created from 5 exposures in Oloneo Photoengine and finished in Photoshop. The HDR was used mostly to brighten the image, as the railing was very bright compared to all other parts of the image, due to the laps under it.
Locked in the morning

thirds

Bubble level

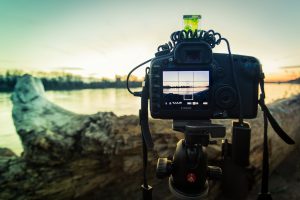
Every time I post a behind the scenes photo, with my camera in it, I get the exact same question: “What is that green cube on your camera?”. Once, it even happened, that after I finished shooting, I went to a restaurant, place my camera on the table, and even the waitress asked me what the green cube was :). So for those that still don’t know what it is, it’s a 3-way bubble level. As my camera is older and it does not have a level function, I use this to keep my photos nice a leveled.

In reality I don’t look at it that much, as with years of practice I get most of my photos leveled, it’s still great, so I am sure all the time. It’s a very cheap piece of equipment (you can find it under 5 USD on eBay if you buy it from China) and it will make you photos much better.

One autumn sunset

I just love sunset colors. And what is even better is to have them doubled by a nice reflection. As I stated many times before, the Kuchajda lake is great for this, as it’s very calm most of the time. Like a natures mirror.

This photo Is a manual blend from 3 exposures. I took 5, but had no need for the +2 and -2EV. Actually all I did was to start with the -1EV, as I liked the sky on that one, and brightened the middle are from the other two exposures. After that I only tweaked mostly detail, colors and contrast. Recently I try to go towards fewer edits on my photos. If I no longer can see all the layers in the list without scrolling, I feel like I have overdone a photo.
One autumn sunset

tutorial-3

Don’t forget the free HDR tutorial

Based on Google analytics, around 50% of all visitors to the blog are first time visitors. And this is just a little not to all of those. If you didn’t notice, this blog also includes a detailed HDR tutorial, which explains a lot of how I edit my photos.

And for those curious when I will continue with the manual blending tutorial, don’t worry, is in the works. It just takes it’s time :)

City of light

You never notice how a bridge shakes with every passing car, until you try to take photos from it. And sadly, the Apollo bridge is not different. It’s really hard to get any longer exposure while shooting from it. It all just get so blurry.

Same here. I used only -3EV to 0EV, as the brighter exposures were blurry. But with a little editing, I think I did fine also without them (and I quite like this darker look :)). This is a manual blend from 4 exposures.
City of light

FREE EBOOK!!!
Subscribe to my newsletter and get a free Capturing fireworks ebook. 
Subscribe